 I’m now working as a Freelancer for more than a year and I think it’s time to write about it again. I previously wrote about Five Ways to Not Suck at Being a Java Freelancer and I even delivered a quick session at Geecon. There is no video yet (should be released soon), but the slides are available.
Anyway, I do get asked a few questions that are not covered in the article or the presentation, so I had the idea to write this post and share my vision as a FAQ. The questions are in no particular order and they reflect my personal experience and should not be treated as an absolute truth.
How do you get clients?
There is no single source to look at. My first client was my previous company. It may look weird, but it was good for everyone. They already knew me and they didn’t have to spend resources looking for other professionals. For me, I was already identified with the company work methods and knew everyone. It was a great way to start.
My next client approached me on LinkedIn. It’s truth that you get a lot of requests and most of them are not interesting, but you only need one to make it worth it. Create a LinkedIn profile and keep it updated and clean. You might get the opportunity that you are looking for.
You can also obtain clients with business cards and colleagues / friends references. Do not underestimate their power. You never know when you are going to bump into someone that has a problem that you can fix (or your colleagues / friends). I was also able to get a few this way.
I do stay away from the platforms that sell you freelance jobs. There is too much competition there, and I prefer to create long time relationships with my clients.
How do I charge my clients?
You should take into account a few factors: the client location, the market in which he operates and your experience with the task in hands.
If you only have 1 year experience with Android, you cannot charge as much as if you have 8 years experience with Java EE. You can usually charge higher for clients operating in the finance sector, but be aware of location. Portugal for instance has very low rates, but in Ireland these are much higher.
It’s fine to charge an hourly or daily rate with different values. Just remember that you and your client must both be comfortable with the rate or you end up risking the business relationship since one of you could become unhappy.
How do you plan the work?
Clients just tell me what they need and I estimate how much time do I need to complete the task. They might not agree with my estimation so you should negotiate with them. Have a look into an post I wrote about estimations: Why it’s challenging to make estimations about code.
What if you exceed you estimation?
First of all, you need to understand why did that happen. Were you very optimistic in the estimation? Did the client provide you with all the information you needed? Or maybe the client added a few extras after the original estimation?
Sometimes you are going to make mistakes and you need to work a few extra hours to finish the work without any extra compensation. No matter what, always be transparent with your client and share everything with him. He will surely understand and help you out.
In other occasions, this will be the client responsibility. You need to negotiate with him, and share with him the possible delays and adjust your estimation and/or price.
How do you deal with multiple clients?
Having multiple clients does not mean that you are working for all at the same time. Important thing here is planning. If they ask you something and you are already occupied, there is no harm in declining. It’s better than accepting multiple tasks and not being able to deliver them properly.
You can always try to postpone the tasks by negotiating with your client. It depends a lot on your client schedule, but if you can pull it off it helps you keep your pipeline for the future.
Do you work in a team?
Yes, most of my work is with a team. In today’s world is hard to do something alone, so it’s only natural to work with other people. I don’t feel that I’m treated differently just because my contractual situation is different. I’m just another member of the team doing my job.
Where do you work?
I work from home most of the time, but I usually go to the client facilities from time to time. For me is important to be able to work remotely due to some personal issues. Clients may not allow you to do that, but you can always propose to work for a few months in their office. When everyone feels comfortable you can switch to remote and return from time to time.
How do you communicate with your clients?
I usually use Skype, Mail and Phone. In these days, there is no reason for not being in constant contact.
How do you deal with timezones?
Since I manage my own schedule, I can always find a suitable time to communicate with my clients, no matter the timezone. Of course it might require you to be available very early or very late.
Do you have a life?
I do! I usually work a regular work week of 40 hours. Sometimes I can work a bit more. The important thing here is to plan your schedule very well, so you can have time for everything.
Missing a question? Feel free to ask it in the comments sections and I’ll be glad to answer it!
I need to start this post by stating that I’ve only started to work seriously with Git within the last year. Unfortunately, a lot of the projects that I work on are still using SVN or CVS, but I’m now finally starting in a few that use Git.
During the last few years, I’ve done a lot of software releases using Maven Release Plugin. I still remember that I’ve took a full week just to setup the plugin in one of my projects. It worked well most of the times, but if something went wrong you could spend the next few hours fixing the problem. Oh boy, what a nightmare!
Recently, I wanted to do the same operation with a Git project and I came across with the Maven JGit-Flow Plugin and I have to tell you that this is fantastic! Very easy to setup and worked flawlessly on the first try!
This plugin is based on the development model described in the post A successful Git branching model by Vincent Driessen. Take your time to read it, since it’s very interesting.
I’m going to show you how to perform a release using this plugin. I’ll use the project from my latest post about Spring Batch as Wildfly Module.
Setup
Setup is very easy, just add the following to your pom.xml:
| <plugin> <groupId>external.atlassian.jgitflow</groupId> <artifactId>jgitflow-maven-plugin</artifactId> <version>1.0-m3</version> <configuration> <noDeploy>true</noDeploy> </configuration> </plugin> |
I’ve just added the noDeploy configuration, because I’m not releasing to a Maven repository. That’s it!
Release
Let’s look at my project branches and version:
1 2 3 4 5 6 7 8 9 10 11 12 13 14 15 16 17 | radcortez:wildfly-spring-batch radcortez$ git branch -avv * master 0b2364b [origin/master] Added documentation. remotes/origin/master 0b2364b Added documentation. radcortez:wildfly-spring-batch radcortez$ mvn help:evaluate -Dexpression=project.version [INFO] Scanning for projects... [INFO] [INFO] ------------------------------------------------------------------------ [INFO] Building wildfly-spring-batch 1.0-SNAPSHOT [INFO] ------------------------------------------------------------------------ [INFO] [INFO] --- maven-help-plugin:2.2:evaluate (default-cli) @ wildfly-spring-batch --- [INFO] No artifact parameter specified, using 'com.cortez.wildfly.batch:wildfly-spring-batch:war:1.0-SNAPSHOT' as project. [INFO] 1.0-SNAPSHOT [INFO] ------------------------------------------------------------------------ [INFO] BUILD SUCCESS [INFO] ------------------------------------------------------------------------ |
Now, just run mvn jgitflow:release-start:
1 2 3 4 5 6 7 8 9 10 11 12 13 14 15 16 17 18 19 20 21 22 23 24 25 | radcortez:wildfly-spring-batch radcortez$ mvn jgitflow:release-start [INFO] Scanning for projects... [INFO] [INFO] ------------------------------------------------------------------------ [INFO] Building wildfly-spring-batch 1.0-SNAPSHOT [INFO] ------------------------------------------------------------------------ [INFO] [INFO] --- jgitflow-maven-plugin:1.0-m3:release-start (default-cli) @ wildfly-spring-batch --- [INFO] ensuring origin exists... [INFO] (develop) Checking for SNAPSHOT version in projects... [INFO] (develop) Checking dependencies and plugins for snapshots ... What is the release version for "wildfly-spring-batch"? (com.cortez.wildfly.batch:wildfly-spring-batch) [1.0]: [INFO] ensuring origin exists... [INFO] (release/1.0) adding snapshot to pom versions... [INFO] (release/1.0) updating poms for all projects... [INFO] turn on debug logging with -X to see exact changes [INFO] (release/1.0) updating pom for wildfly-spring-batch... What is the development version for "wildfly-spring-batch"? (com.cortez.wildfly.batch:wildfly-spring-batch) [1.1-SNAPSHOT]: [INFO] (develop) updating poms with next development version... [INFO] (develop) updating poms for all projects... [INFO] turn on debug logging with -X to see exact changes [INFO] (develop) updating pom for wildfly-spring-batch... [INFO] ------------------------------------------------------------------------ [INFO] BUILD SUCCESS [INFO] ------------------------------------------------------------------------ |
You get an interactive menu to pick the version numbers you want to release, the same way as Maven Release Plugin. I’m developing on the master branch, but during this process a release branch is created with the release versions and development branch with the new development versions.
| radcortez:wildfly-spring-batch radcortez$ git branch -avv develop 728856a [origin/develop] updating poms for 1.1-SNAPSHOT development master 0b2364b [origin/master] Added documentation. * release/1.0 9f88a42 updating poms for branch '1.0' with snapshot versions remotes/origin/master 0b2364b Added documentation. |
Now the cool thing about this, is that everything is still in your local environment! If you are not happy with the changes, you can get rid of the branches and start over. No build was performed at this point.
If we want to release, just run mvn jgitflow:release-finish:
1 2 3 4 5 6 7 8 9 10 11 12 13 14 15 16 17 18 19 20 21 22 | radcortez:wildfly-spring-batch radcortez$ mvn jgitflow:release-finish [INFO] Scanning for projects... [INFO] [INFO] ------------------------------------------------------------------------ [INFO] Building wildfly-spring-batch 1.0 [INFO] ------------------------------------------------------------------------ [INFO] [INFO] --- jgitflow-maven-plugin:1.0-m3:release-finish (default-cli) @ wildfly-spring-batch --- [INFO] ensuring origin exists... [INFO] running jgitflow release finish... [INFO] ensuring origin exists... [INFO] (release/1.0) Updating poms for RELEASE [INFO] (release/1.0) removing snapshot from pom versions... [INFO] (release/1.0) updating poms for all projects... [INFO] turn on debug logging with -X to see exact changes [INFO] (release/1.0) updating pom for wildfly-spring-batch... [INFO] (release/1.0) Checking for RELEASE version in projects... [INFO] (release/1.0) Checking dependencies and plugins for snapshots ... [INFO] Scanning for projects... [INFO] [INFO] ------------------------------------------------------------------------ [INFO] Building wildfly-spring-batch 1.0 |
In this step, the release branch is going to get merged as described in A successful Git branching model and create the tag. Remember, nothing has been pushed yet, so you can always revert the process.
Let’s have a look into the branches and tags now:
| radcortez:wildfly-spring-batch radcortez$ git branch -avv * develop a8e762b [origin/develop] Updating develop poms back to pre merge state master b6fbda0 [origin/master: ahead 3] Merge branch 'release/1.0' remotes/origin/master 0b2364b Added documentation. radcortez:wildfly-spring-batch radcortez$ git tag 1.0 |
Now you’re a push away to complete your release and ready to keep developing in your new updated development branch. How easy was that?
Conclusion
Looking into some differences between the original release plugin and jgitflow:
- You don’t have to worry about stage commits. Everything is local until you push.
- No more problems with other people changing pom.xml during the process.
- Your project is only built once, saving release time.
- Very easy to setup. Everything is picked from your Git configuration.
When I was investigating / writing, I’ve found this very interesting post, about an alternative way to perform the release. It’s worth reading: http://axelfontaine.com/blog/final-nail.html by Axel Fontaine
(TL;DR – Get me to the
code)
For a long time, the Java EE specification was lacking a Batch Processing API. Today, this is an essential necessity for enterprise applications. This was finally fixed with the JSR-352 Batch Applications for the Java Platform now available in Java EE 7. The JSR-352 got it’s inspiration from the Spring Batch counterpart. Both cover the same concepts, although the resulting API’s are a bit different.
Since the Spring team also collaborated in the JSR-352, it was only a matter of time for them to provide an implementation based on Spring Batch. The latest major version of Spring Batch (version 3), now supports the JSR-352.
I’m a Spring Batch user for many years and I’ve always enjoyed that the technology had a interesting set of built-in readers and writers. These allowed you to perform the most common operations required by batch processing. Do you need to read data from a database? You could use JdbcCursorItemReader, how about writing data in a fixed format? Use FlatFileItemWriter, and so on.
Unfortunately, JSR-352 implementations do not have the amount of readers and writers available in Spring Batch. We have to remember that JSR-352 is very recent and didn’t have time to catch up. jBeret, the Wildfly implementation for JSR-352 already provides a few custom readers and writers.
What’s the point?
I was hoping that with the latest release, all the readers and writers from the original Spring Batch would be available as well. This is not the case yet, since it would take a lot of work, but there are plans to make them available in future versions. This would allow us to migrate native Spring Batch applications into JSR-352. We still have the issue of the implementation vendor lock-in, but it may be interesting in some cases.
Motivation
I’m one of the main test contributors for the Java EE Samples in the JSR-352 specification. I wanted to find out if the tests I’ve implemented have the same behaviour using the Spring Batch implementation. How can we do that?
Code
I think this exercise is not only interesting because of the original motivation, but it’s also useful to learn about modules and class loading on Wildfly. First we need to decide how are we going to deploy the needed Spring Batch dependencies. We could deploy them directly with the application, or use a Wildfly module. Modules have the advantage to be bundled directly into the application server and can be reused by all deployed applications.
Adding Wildfly Module with Maven
With a bit of work it’s possible to add the module automatically with the Wildfly Maven Plugin and the CLI (command line). Let’s start to create two files that represent the CLI commands that we need to create and remove the module:
wildfly-add-spring-batch.cli
| # Connect to Wildfly instance connect # Create Spring Batch Module # If the module already exists, Wildfly will output a message saying that the module already exists and the script exits. module add \ --name=org.springframework.batch \ --dependencies=javax.api,javaee.api \ --resources=${wildfly.module.classpath} |
The module --name is important. We’re going to need it to reference it in our application. The --resources is a pain, since you need to indicate a full classpath to all the required module dependencies, but we’re generating the paths in the next few steps.
wildfly-remove-spring-batch.cli
| # Connect to Wildfly instance connect # Remove Oracle JDBC Driver Module module remove --name=org.springframework.batch |
Note wildfly.module.classpath. This property will hold the complete classpath for the required Spring Batch dependencies. We can generate it with Maven Dependency plugin:
1 2 3 4 5 6 7 8 9 10 11 12 13 14 15 16 17 18 19 20 | <plugin> <groupId>org.apache.maven.plugins</groupId> <artifactId>maven-dependency-plugin</artifactId> <version>${version.plugin.dependency}</version> <executions> <execution> <phase>generate-sources</phase> <goals> <goal>build-classpath</goal> </goals> <configuration> <outputProperty>wildfly.module.classpath</outputProperty> <pathSeparator>:</pathSeparator> <excludeGroupIds>javax</excludeGroupIds> <excludeScope>test</excludeScope> <includeScope>provided</includeScope> </configuration> </execution> </executions> </plugin> |
This is going to pick all dependencies (including transitive), exclude javax (since they are already present in Wildfly) and exclude test scope dependencies. We need the following dependencies for Spring Batch:
1 2 3 4 5 6 7 8 9 10 11 12 13 14 15 16 17 18 19 20 21 22 23 24 25 26 27 28 | <!-- Needed for Wildfly module --> <dependency> <groupId>org.springframework.batch</groupId> <artifactId>spring-batch-core</artifactId> <version>3.0.0.RELEASE</version> <scope>provided</scope> </dependency> <dependency> <groupId>org.springframework</groupId> <artifactId>spring-jdbc</artifactId> <version>4.0.5.RELEASE</version> <scope>provided</scope> </dependency> <dependency> <groupId>commons-dbcp</groupId> <artifactId>commons-dbcp</artifactId> <version>1.4</version> <scope>provided</scope> </dependency> <dependency> <groupId>org.hsqldb</groupId> <artifactId>hsqldb</artifactId> <version>2.3.2</version> <scope>provided</scope> </dependency> |
Now, we need to replace the property in the file. Let’s use Maven Resources plugin:
1 2 3 4 5 6 7 8 9 10 11 12 13 14 15 16 17 18 19 20 21 22 23 | <plugin> <groupId>org.apache.maven.plugins</groupId> <artifactId>maven-resources-plugin</artifactId> <version>${version.plugin.resources}</version> <executions> <execution> <id>copy-resources</id> <phase>process-resources</phase> <goals> <goal>copy-resources</goal> </goals> <configuration> <outputDirectory>${basedir}/target/scripts</outputDirectory> <resources> <resource> <directory>src/main/resources/scripts</directory> <filtering>true</filtering> </resource> </resources> </configuration> </execution> </executions> </plugin> |
This will filter the configured files and replace the property wildfly.module.classpath with the value we generated previously. This is a classpath pointing to the dependencies in your local Maven repository. Now with Wildfly Maven Plugin we can execute this script (you need to have Wildfly running):
| <plugin> <groupId>org.wildfly.plugins</groupId> <artifactId>wildfly-maven-plugin</artifactId> <version>${version.plugin.wildfly}</version> <configuration> <skip>false</skip> <executeCommands> <batch>false</batch> <scripts> <!--suppress MavenModelInspection --> <script>target/scripts/${cli.file}</script> </scripts> </executeCommands> </configuration> </plugin> |
And these profiles:
| <profiles> <profile> <id>install-spring-batch</id> <properties> <cli.file>wildfly-add-spring-batch.cli</cli.file> </properties> </profile> <profile> <id>remove-spring-batch</id> <properties> <cli.file>wildfly-remove-spring-batch.cli</cli.file> </properties> </profile> </profiles> |
(For the full pom.xml contents, check here)
We can add the module by executing:
mvn process-resources wildfly:execute-commands -P install-spring-batch.
Or remove the module by executing:
mvn wildfly:execute-commands -P remove-spring-batch.
This strategy works for any module that you want to create into Wildfly. Think about adding a JDBC driver. You usually use a module to add it into the server, but all the documentation I’ve found about this is always a manual process. This works great for CI builds, so you can have everything you need to setup your environment.
Use Spring-Batch
Ok, I have my module there, but how can I instruct Wildfly to use it instead of jBeret? We need to add a the following file in META-INF folder of our application:
jboss-deployment-structure.xml
| <?xml version="1.0" encoding="UTF-8"?> <jboss-deployment-structure> <deployment> <exclusions> <module name="org.wildfly.jberet"/> <module name="org.jberet.jberet-core"/> </exclusions> <dependencies> <module name="org.springframework.batch" services="import" meta-inf="import"/> </dependencies> </deployment> </jboss-deployment-structure> |
Since the JSR-352 uses a Service Loader to load the implementation, the only possible outcome would be to load the service specified in org.springframework.batch module. Your batch code will now run with the Spring Batch implementation.
Testing
The github repository code, has Arquillian sample tests that demonstrate the behaviour. Check the Resources section below.
Resources
You can clone a full working copy from my github repository. You can find instructions there to deploy it.
Wildfly – Spring Batch
Since I may modify the code in the future, you can download the original source of this post from the release 1.0. In alternative, clone the repo, and checkout the tag from release 1.0 with the following command: git checkout 1.0.
Future
I’ve still need to apply this to the Java EE Samples. It’s on my TODO list.
This is the promised follow up to the Java EE 7 with Angular JS – Part 1. It took longer than I expect (to find the time to prepare the code and blog post), but it’s finally here!
The Application
The original application in Part 1 it’s only a simple list with pagination and a REST service that feeds the list data.

In this post we’re going to add CRUD (Create, Read, Update, Delete) capabilities, bind REST services to perform these operations on the server side and validate the data.
The Setup
The Setup is the same from Part 1, but here is the list for reference:
The Code
Backend – Java EE 7
The backend does not required many changes. Since we want the ability to create, read, update and delete, we need to add the appropriate methods in the REST service to perform these operations:
1 2 3 4 5 6 7 8 9 10 11 12 13 14 15 16 17 18 19 20 21 22 23 24 25 26 27 28 29 30 31 32 33 34 35 36 37 38 39 40 41 42 43 44 45 46 47 48 49 50 51 52 53 54 55 56 57 58 59 60 61 62 63 64 65 66 67 68 69 70 71 72 73 74 75 76 77 78 79 80 81 82 83 84 85 86 87 88 89 90 91 92 93 94 95 | package com.cortez.samples.javaee7angular.rest; import com.cortez.samples.javaee7angular.data.Person; import com.cortez.samples.javaee7angular.pagination.PaginatedListWrapper; import javax.ejb.Stateless; import javax.persistence.EntityManager; import javax.persistence.PersistenceContext; import javax.persistence.Query; import javax.ws.rs.*; import javax.ws.rs.core.Application; import javax.ws.rs.core.MediaType; import java.util.List; @Stateless @ApplicationPath("/resources") @Path("persons") @Consumes(MediaType.APPLICATION_JSON) @Produces(MediaType.APPLICATION_JSON) public class PersonResource extends Application { @PersistenceContext private EntityManager entityManager; private Integer countPersons() { Query query = entityManager.createQuery("SELECT COUNT(p.id) FROM Person p"); return ((Long) query.getSingleResult()).intValue(); } @SuppressWarnings("unchecked") private List<Person> findPersons(int startPosition, int maxResults, String sortFields, String sortDirections) { Query query = entityManager.createQuery("SELECT p FROM Person p ORDER BY " + sortFields + " " + sortDirections); query.setFirstResult(startPosition); query.setMaxResults(maxResults); return query.getResultList(); } private PaginatedListWrapper<Person> findPersons(PaginatedListWrapper<Person> wrapper) { wrapper.setTotalResults(countPersons()); int start = (wrapper.getCurrentPage() - 1) * wrapper.getPageSize(); wrapper.setList(findPersons(start, wrapper.getPageSize(), wrapper.getSortFields(), wrapper.getSortDirections())); return wrapper; } @GET public PaginatedListWrapper<Person> listPersons(@DefaultValue("1") @QueryParam("page") Integer page, @DefaultValue("id") @QueryParam("sortFields") String sortFields, @DefaultValue("asc") @QueryParam("sortDirections") String sortDirections) { PaginatedListWrapper<Person> paginatedListWrapper = new PaginatedListWrapper<>(); paginatedListWrapper.setCurrentPage(page); paginatedListWrapper.setSortFields(sortFields); paginatedListWrapper.setSortDirections(sortDirections); paginatedListWrapper.setPageSize(10); return findPersons(paginatedListWrapper); } @GET @Path("{id}") public Person getPerson( @PathParam("id") Long id) { return entityManager.find(Person.class, id); } @POST public Person savePerson(Person person) { if (person.getId() == null) { Person personToSave = new Person(); personToSave.setName(person.getName()); personToSave.setDescription(person.getDescription()); personToSave.setImageUrl(person.getImageUrl()); entityManager.persist(person); } else { Person personToUpdate = getPerson(person.getId()); personToUpdate.setName(person.getName()); personToUpdate.setDescription(person.getDescription()); personToUpdate.setImageUrl(person.getImageUrl()); person = entityManager.merge(personToUpdate); } return person; } @DELETE @Path("{id}") public void deletePerson(@PathParam("id") Long id) { entityManager.remove(getPerson(id)); } } |
The code is exactly as a normal Java POJO, but using the Java EE annotations to enhance the behaviour. @ApplicationPath("/resources") and @Path("persons") will expose the REST service at the url yourdomain/resources/persons (yourdomain will be the host where the application is running). @Consumes(MediaType.APPLICATION_JSON) and @Produces(MediaType.APPLICATION_JSON) accept and format REST request and response as JSON.
For the REST operations:
| Annotation / HTTP Method | Java Method | URL | Behaviour |
|---|
@GET / GET | listPersons | http://yourdomain/resources/persons | Returns a paginated list of 10 persons. |
@GET / GET | getPerson | http://yourdomain/resources/persons/{id} | Returns a Person entity by it’s id. |
@POST / POST | savePerson | http://yourdomain/resources/persons | Creates or Updates a Person. |
@DELETE / DELETE | deletePerson | http://yourdomain/resources/persons/{id} | Deletes a Person entity by it’s id. |
The url invoked for each operations is very similar. The magic to distinguish which operation needs to be called is defined in the HTTP method itself when the request is submitted. Check HTTP Method definitions.
For getPerson and deletePerson note that we added the annotation @Path("{id}") which defines an optional path to call the service. Since we need to know which object we want to get or delete, we need to indicate the id somehow. This is done in the service url to be called, so if we want to delete the Person with id 1, we would call http://yourdomain/resources/persons/1 with the HTTP method DELETE.
That’s it for the backend stuff. Only 30 lines of code added to the old REST service. I have also added a new property to the Person object, to hold a link to image with the purpose of displaying an avatar of the person.
UI – Angular JS
For the UI part, I’ve decided to split it into 3 sections: the grid, the form and the feedback messages sections, each with its own Angular controller. The grid is mostly the same from Part 1, but it did require some tweaks for the new stuff:
Grid HTML
| <!-- Specify a Angular controller script that binds Javascript variables to the grid.--> <div class="grid" ng-controller="personsListController"> <div> <h3>List Persons</h3> </div> <!-- Binds the grid component to be displayed. --> <div class="gridStyle" ng-grid="gridOptions"></div> <!-- Bind the pagination component to be displayed. --> <pagination direction-links="true" boundary-links="true" total-items="persons.totalResults" items-per-page="persons.pageSize" ng-model="persons.currentPage" ng-change="refreshGrid()"> </pagination> </div> |
Nothing special here. Pretty much the same as Part 1.
Grid Angular Controller
1 2 3 4 5 6 7 8 9 10 11 12 13 14 15 16 17 18 19 20 21 22 23 24 25 26 27 28 29 30 31 32 33 34 35 36 37 38 39 40 41 42 43 44 45 46 47 48 49 50 51 52 53 54 55 56 57 58 59 60 61 62 63 64 65 66 67 68 69 | app.controller('personsListController', function ($scope, $rootScope, personService) { // Initialize required information: sorting, the first page to show and the grid options. $scope.sortInfo = {fields: ['id'], directions: ['asc']}; $scope.persons = {currentPage: 1}; $scope.gridOptions = { data: 'persons.list', useExternalSorting: true, sortInfo: $scope.sortInfo, columnDefs: [ { field: 'id', displayName: 'Id' }, { field: 'name', displayName: 'Name' }, { field: 'description', displayName: 'Description' }, { field: '', width: 30, cellTemplate: '<span class="glyphicon glyphicon-remove remove" ng-click="deleteRow(row)"></span>' } ], multiSelect: false, selectedItems: [], // Broadcasts an event when a row is selected, to signal the form that it needs to load the row data. afterSelectionChange: function (rowItem) { if (rowItem.selected) { $rootScope.$broadcast('personSelected', $scope.gridOptions.selectedItems[0].id); } } }; // Refresh the grid, calling the appropriate rest method. $scope.refreshGrid = function () { var listPersonsArgs = { page: $scope.persons.currentPage, sortFields: $scope.sortInfo.fields[0], sortDirections: $scope.sortInfo.directions[0] }; personService.get(listPersonsArgs, function (data) { $scope.persons = data; }) }; // Broadcast an event when an element in the grid is deleted. No real deletion is perfomed at this point. $scope.deleteRow = function (row) { $rootScope.$broadcast('deletePerson', row.entity.id); }; // Watch the sortInfo variable. If changes are detected than we need to refresh the grid. // This also works for the first page access, since we assign the initial sorting in the initialize section. $scope.$watch('sortInfo.fields[0]', function () { $scope.refreshGrid(); }, true); // Do something when the grid is sorted. // The grid throws the ngGridEventSorted that gets picked up here and assigns the sortInfo to the scope. // This will allow to watch the sortInfo in the scope for changed and refresh the grid. $scope.$on('ngGridEventSorted', function (event, sortInfo) { $scope.sortInfo = sortInfo; }); // Picks the event broadcasted when a person is saved or deleted to refresh the grid elements with the most // updated information. $scope.$on('refreshGrid', function () { $scope.refreshGrid(); }); // Picks the event broadcasted when the form is cleared to also clear the grid selection. $scope.$on('clear', function () { $scope.gridOptions.selectAll(false); }); }); |
A few more attributes are required to configure the behaviour of the grid. The important bits are the data: 'persons.list' which binds the grid data to Angular model value $scope.persons, the columnDefs which allow us to model the grid as we see fit. Since I wanted to add an option to delete each row, I needed to add a new cell which call the function deleteRow when you click in cross icon. The afterSelectionChanges function is required to update the form data with the person selected in the grid. You can check other grid options here.
The rest of the code is self-explanatory and there is also a few comments in there. A special note about $rootScope.$broadcast: this is used to dispatch an event to all the other controllers. This is a way to communicate between controllers, since the grid, form and feedback messages have separate controllers. If everything was in only one controller, this was not required and a simple function call would be enough. Another possible solution if we want to keep the multiple controllers, would be to use Angular services. The used approach seems much cleaner since it separates the application concerns and does not require you to implement additional Angular services, but it might be a little harder to debug if needed.
Form HTML
1 2 3 4 5 6 7 8 9 10 11 12 13 14 15 16 17 18 19 20 21 22 23 24 25 26 27 28 29 30 31 32 33 34 35 36 37 38 39 40 41 42 43 44 45 46 47 48 49 50 51 52 53 54 55 56 57 58 59 60 61 62 63 64 65 66 67 68 69 70 71 72 73 | <div class="form" ng-controller="personsFormController"> <!-- Verify person, if there is no id present, that we are Adding a Person --> <div ng-if="person.id == null"> <h3>Add Person</h3> </div> <!-- Otherwise it's an Edit --> <div ng-if="person.id != null"> <h3>Edit Person</h3> </div> <div> <!-- Specify the function to be called on submit and disable HTML5 validation, since we're using Angular validation--> <form name="personForm" ng-submit="updatePerson()" novalidate> <!-- Display an error if the input is invalid and is dirty (only when someone changes the value) --> <div class="form-group" ng-class="{'has-error' : personForm.name.$invalid && personForm.name.$dirty}"> <label for="name">Name:</label> <!-- Display a check when the field is valid and was modified --> <span ng-class="{'glyphicon glyphicon-ok' : personForm.name.$valid && personForm.name.$dirty}"></span> <input id="name" name="name" type="text" class="form-control" maxlength="50" ng-model="person.name" required ng-minlength="2" ng-maxlength="50"/> <!-- Validation messages to be displayed on required, minlength and maxlength --> <p class="help-block" ng-show="personForm.name.$error.required">Add Name.</p> <p class="help-block" ng-show="personForm.name.$error.minlength">Name must be at least 2 characters long.</p> <p class="help-block" ng-show="personForm.name.$error.maxlength">Name cannot be longer than 50 characters.</p> </div> <!-- Display an error if the input is invalid and is dirty (only when someone changes the value) --> <div class="form-group" ng-class="{'has-error' : personForm.description.$invalid && personForm.description.$dirty}"> <label for="description">Description:</label> <!-- Display a check when the field is valid and was modified --> <span ng-class="{'glyphicon glyphicon-ok' : personForm.description.$valid && personForm.description.$dirty}"></span> <input id="description" name="description" type="text" class="form-control" maxlength="100" ng-model="person.description" required ng-minlength="5" ng-maxlength="100"/> <!-- Validation messages to be displayed on required, minlength and maxlength --> <p class="help-block" ng-show="personForm.description.$error.required">Add Description.</p> <p class="help-block" ng-show="personForm.description.$error.minlength">Description must be at least 5 characters long.</p> <p class="help-block" ng-show="personForm.description.$error.maxlength">Description cannot be longer than 100 characters.</p> </div> <!-- Display an error if the input is invalid and is dirty (only when someone changes the value) --> <div class="form-group" ng-class="{'has-error' : personForm.imageUrl.$invalid && personForm.imageUrl.$dirty}"> <label for="imageUrl">Image URL:</label> <!-- Display a check when the field is valid and was modified --> <span ng-class="{'glyphicon glyphicon-ok' : personForm.imageUrl.$valid && personForm.imageUrl.$dirty}"></span> <input id="imageUrl" name="imageUrl" type="url" class="form-control" maxlength="500" ng-model="person.imageUrl" required/> <!-- Validation messages to be displayed on required and invalid. Type 'url' makes checks to a proper url format. --> <p class="help-block" ng-show="personForm.imageUrl.$error.required">Add Image URL.</p> <p class="help-block" ng-show="personForm.imageUrl.$invalid && personForm.imageUrl.$dirty">Invalid Image URL.</p> </div> <div class="avatar" ng-if="person.imageUrl"> <img ng-src="{{person.imageUrl}}" width="400" height="250"/> </div> <!-- Form buttons. The 'Save' button is only enabled when the form is valid. --> <div class="buttons"> <button type="button" class="btn btn-primary" ng-click="clearForm()">Clear</button> <button type="submit" class="btn btn-primary" ng-disabled="personForm.$invalid">Save</button> </div> </form> </div> </div> |
Here is the looks:
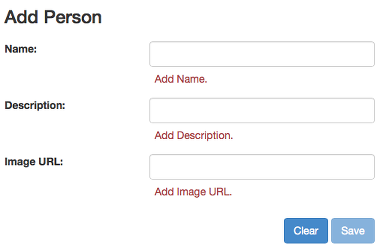
A lot of codeis for validation purposes, but lets look into this a bit more in detail: each input element binds its value to person.something. This allows to model the data between the HTML and the Javascript controller, so we can write $scope.person.name in our controller to get the value filled in the form input with name, name. To access the data inside the HTML form we use the form name personForm plus the name of the input field.
HTML5 have its own set of validations in the input fields, but we want to use the Angular ones. In that case, we need to disable form validations by using novalidate at the form element. Now, to use Angular validations, we can use a few Angular directives in the input elements. For this very basic form, we only use required, ng-minlength and ng-maxlength, but you can use others. Just look into the documentation.
Angular assigns CSS classes based on the input validation state. To have an idea, these are the possible values:
| State | CSS | On |
|---|
valid | ng-valid | When the field is valid. |
invalid | ng-invalid | When the field is invalid. |
pristine | ng-pristine | When the field was never touched before. |
dirty | ng-dirty | When the field is changed. |
These CSS classes are empty. You need to create them and assign them styles in an included CSS sheet for the application. Instead, we’re going to use styles from Bootstrap which are very nice. For them to work, a few additional classes need to be applied to the elements. The div element enclosing the input needs the CSS class form-group and the input element needs the CSS class form-control.
To display an invalid input field we add ng-class="{'has-error' : personForm.name.$invalid && personForm.name.$dirty}" to the containing input div. This code evaluates if the name in the personForm is invalid and if it’s dirty. It the condition verifies, then the input is displayed as invalid.
Finally, for the form validation messages we need to verify the $error directive for each of the inputs and types of validations being performed. Just add ng-show="personForm.name.$error.minlength" to an HTML display element with a message to warn the user that the name input field is too short.
Form Angular Controller
1 2 3 4 5 6 7 8 9 10 11 12 13 14 15 16 17 18 19 20 21 22 23 24 25 26 27 28 29 30 31 32 33 34 35 36 37 38 39 40 41 42 43 44 45 46 47 48 49 50 51 52 53 | // Create a controller with name personsFormController to bind to the form section. app.controller('personsFormController', function ($scope, $rootScope, personService) { // Clears the form. Either by clicking the 'Clear' button in the form, or when a successfull save is performed. $scope.clearForm = function () { $scope.person = null; // For some reason, I was unable to clear field values with type 'url' if the value is invalid. // This is a workaroud. Needs proper investigation. document.getElementById('imageUrl').value = null; // Resets the form validation state. $scope.personForm.$setPristine(); // Broadcast the event to also clear the grid selection. $rootScope.$broadcast('clear'); }; // Calls the rest method to save a person. $scope.updatePerson = function () { personService.save($scope.person).$promise.then( function () { // Broadcast the event to refresh the grid. $rootScope.$broadcast('refreshGrid'); // Broadcast the event to display a save message. $rootScope.$broadcast('personSaved'); $scope.clearForm(); }, function () { // Broadcast the event for a server error. $rootScope.$broadcast('error'); }); }; // Picks up the event broadcasted when the person is selected from the grid and perform the person load by calling // the appropiate rest service. $scope.$on('personSelected', function (event, id) { $scope.person = personService.get({id: id}); }); // Picks us the event broadcasted when the person is deleted from the grid and perform the actual person delete by // calling the appropiate rest service. $scope.$on('deletePerson', function (event, id) { personService.delete({id: id}).$promise.then( function () { // Broadcast the event to refresh the grid. $rootScope.$broadcast('refreshGrid'); // Broadcast the event to display a delete message. $rootScope.$broadcast('personDeleted'); $scope.clearForm(); }, function () { // Broadcast the event for a server error. $rootScope.$broadcast('error'); }); }); }); |
For the form controller, we need the two functions that perform the operations associated with the button Clear and the button Save which are self-explanatory. A quick note: for some reason, Angular does not clear input fields which are in invalid state. I did found a few people complaining about the same problem, but I need to investigate this further. Maybe it’s something I’m doing wrong.
REST services are called using save and delete from the $resource object which already implement the correspondent HTTP methods. Check the documentation. You can get a $resource with the following factory:
| // Service that provides persons operations app.factory('personService', function ($resource) { return $resource('resources/persons/:id'); }); |
The rest of the controller code, are functions to pickup the events created by the grid to load the person data in the form and delete the person. This controller also create a few events. If we add or remove persons, the grid needs to be updated so an event is generated requesting the grid to be updated.
Feedback Messages HTML
| <!-- Specify a Angular controller script that binds Javascript variables to the feedback messages.--> <div class="message" ng-controller="alertMessagesController"> <alert ng-repeat="alert in alerts" type="{{alert.type}}" close="closeAlert($index)">{{alert.msg}}</alert> </div> |
This is just the top section of the application, to display success or error messages based on save, delete or server error.
Feedback Messages Angular Controller
1 2 3 4 5 6 7 8 9 10 11 12 13 14 15 16 17 18 19 20 21 22 23 24 25 26 27 | // Create a controller with name alertMessagesController to bind to the feedback messages section. app.controller('alertMessagesController', function ($scope) { // Picks up the event to display a saved message. $scope.$on('personSaved', function () { $scope.alerts = [ { type: 'success', msg: 'Record saved successfully!' } ]; }); // Picks up the event to display a deleted message. $scope.$on('personDeleted', function () { $scope.alerts = [ { type: 'success', msg: 'Record deleted successfully!' } ]; }); // Picks up the event to display a server error message. $scope.$on('error', function () { $scope.alerts = [ { type: 'danger', msg: 'There was a problem in the server!' } ]; }); $scope.closeAlert = function (index) { $scope.alerts.splice(index, 1); }; }); |
This is the controller that push the messages to the view. Listens to the events created by the grid and the form controllers.
The End Result
Uff.. that was a lot of code and new information. Let’s see the final result:
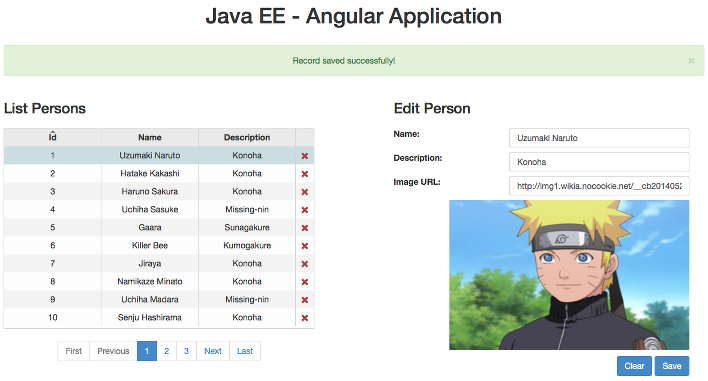
There is also a live version running in http://javaee7-angular.radcortez.cloudbees.net, thanks to Cloudbees. It may take a while to open if the cloud instances is hibernated (because of no usage).
Unfortunately, Cloudbees stopped application hosting, but you can try using Codenvy in the following URL: https://codenvy.com/f?id=3qe4qr7mb8i86lpe. Check the post: Codenvy setup to demo applications using Docker: Java EE 7 with Angular.
Resources
You can clone a full working copy from my github repository and deploy it to Wildfly. You can find instructions there to deploy it. Should also work on Glassfish.
Java EE – Angular JS Source
Since I may modify the code in the future, you can download the original source of this post from the release 3.0. In alternative, clone the repo and checkout the tag from release 3.0 with the following command: git checkout 3.0.
Check also:
Final Thoughts
- The form validation kicks in right after you start typing. Angular 1.3 will have an on blur property to validate only after loosing focus, but I’m still using Angular 1.2.x.
- I have to confess that I found the validation code a bit too verbose. I don’t know if there is a way to simplify it, but you shouldn’t need to add each message validation to each input.
- A few things are still lacking here, like parameters sanitisation or server side validation. I’ll cover those in a next blog post.
This was a very long post, actually the longest I’ve wrote on my blog. If you reached this far, thank you so much for your time reading this post. I hope you enjoyed it! Let me know if you have any comments.
Last Wednesday, 16 July 2014, the fifth meeting of Coimbra JUG was held on the Department of Informatics Engineering of the University of Coimbra, in Portugal. The attendance was very good, we had around 30 people to listen João Antunes talk about the Web Framework – Spring MVC. A very special thanks to João for taking the challenge and steer the session.
This topic continues a long list of Web Frameworks planned to be presented at Coimbra JUG. Have a look into the most wanted sessions pool, and cast your vote if you’re a member.

I did a quick introduction about Coimbra JUG for the newcomers and João dived right into the session about Spring MVC. Spring MVC is not exactly a new technology, but only one or two attendees were using it. The rest of the attendees seemed very curious and interested to learn about it.
Looking into Rebellabs – Java Tools and Technologies Landscape for 2014, Spring MVC appears at 1st place for the Web Frameworks in use with a 40% share. A huge percentage, which means that is very likely for you to como across with it in the future.
As always, we had surprises for the attendees: beer and chocolates, if you participated in the discussion. IntelliJ sponsored our event, by offering a free license to raffle among the attendees. Congratulations to João Baltazar for winning the license. Develop with pleasure! We also offered the book The Definitive Guide to HTML5 WebSocket courtesy of Kaazing, congratulations to Jessica Vicente. Finally, we gave away two Atlassian Stash t-shirs: “Just Do GIT” to Mário Homem and João Almeida.
Here are the materials for the session:
Enjoy!