In one way or another, every developer has come in touch with an API. Either integrating a major system for a big corporation, producing some fancy charts with the latest graph library, or simply by interacting with his favorite programming language. The truth is that APIs are everywhere! They actually represent a fundamental building block of the nowadays Internet, playing a fundamental role in the data exchange process that takes place between different systems and devices. From the simple weather widget on your mobile phone to a credit card payment you perform on an online shop, all of these wouldn’t be possible if those systems wouldn’t communicate with each other by calling one another’s APIs.
So with the ever growing eco-system of heterogeneous devices connected to the internet, APIs are put a new set of demanding challenges. While they must continue to perform in a reliable and secure manner, they must also be compatible with all these devices that can range from a wristwatch to the most advanced server in a data-center.
REST to the rescue
One of the most widely used technologies for building such APIs are the so called REST APIs. These APIs aim to provide a generic and standardize way of communication between heterogeneous systems. Because they heavily rely on standard communication protocols and data representation – like HTTP, XML or JSON – it’s quite easy to provide client side implementations on most programming languages, thus making them compatible with the vast majority of systems and devices.
So while these REST APIs can be compatible with most devices and technologies out there, they also must evolve. And the problem with evolution is that you sometimes have to maintain retro-compatibility with old client versions.
Let’s build up an example.
Let’s imagine an appointment system where you have an API to create and retrieve appointments. To simplify things let’s imagine our appointment object with a date and a guest name. Something like this:
| public class AppointmentDTO { public Long id; public Date date; public String guestName; } |
A very simple REST API would look like this:
| @Path("/api/appointments") public class AppointmentsAPI { @GET @Path("/{id}") public AppointmentDTO getAppointment(@PathParam("id") String id) { ... } @POST public void createAppointment(AppointmentDTO appointment) { ... } } |
Let’s assume this plain simple API works and is being used on mobile phones, tablets and various websites that allow for booking and displaying appointments. So far so good.
At some point, you decide it would be very interesting to start gathering some statistics about your appointment system. To keep things simple you just want to know who’s the person who booked most times. For this you would need to correlate guest between themselves and decide you need to add an unique identifier to each guest. Let’s use Email. So now your object model would look like something like this:
| public class AppointmentDTO { public Long id; public Date date; public GuestDTO guest; } public class GuestDTO { public String email; public String name; } |
So our object model changed slightly which means we will have to adapt the business logic on our api.
The Problem

While adapting the API to store and retrieve the new object types should be a no brainer, the problem is that all your current clients are using the old model and will continue to do so until they update. One can argue that you shouldn’t have to worry about this, and that customers should update to the newer version, but the truth is that you can’t really force an update from night to day. There will always be a time window where you have to keep both models running, which means your api must be retro-compatible.
This is where your problems start.
So back to our example, in this case it means that our API will have to handle both object models and be able to store and retrieve those models depending on the client. So let’s add back the guestName to our object to maintain compatibility with the old clients:
| public class AppointmentDTO { public Long id; public Date date; @Deprecated //For retro compatibility purposes public String guestName; public GuestDTO guest; } |
Remember a good thumb rule on API objects is that you should never delete fields. Adding new ones usually won’t break any client implementations (assuming they follow a good thumb rule of ignoring new fields), but removing fields is usually a road to nightmares.
Now for maintaining the API compatible, there are a few different options. Let’s look at some of the alternatives:
- Duplication: pure and simple. Create a new method for the new clients and have the old ones using the same one.
- Query parameters: introduce a flag to control the behavior. Something like useGuests=true.
- API Versioning: Introduce a version in your URL path to control which method version to call.
So all these alternatives have their pros and cons. While duplication can be plain simple, it can easily turn your API classes into a bowl of duplicated code.
Query parameters can (and should) be used for behavior control (for example to add pagination to a listing) but we should avoid using them for actual API evolutions, since these are usually of a permanent kind and therefore you don’t want to make it optional for the consumer.
Versioning seems like a good idea. It allows for a clean way to evolve the API, it keeps old clients separated from new ones and provides a generic base from all kinds of changes that will occur during your API lifespan. On the other hand it also introduces a bit of complexity, specially if you will have different calls at different versions. Your clients would end up having to manage your API evolution themselves by upgrading a call, instead of the API. It’s like instead of upgrading a library to the next version, you would upgrade only a certain class of that library. This can easily turn into a version nightmare…
To overcome this we must ensure that our versions cover the whole API. This means that I should be able to call every available method on /v1 using /v2. Of course that if a newer version on a given method exists on v2 it should be run on the /v2 call. However, if a given method hasn’t changed in v2, I expect that the v1 version would seamlessly be called.
Inheritance based API Versioning
In order to achieve this we can take advantage of Java objects polymorphic capabilities. We can build up API versions in a hierarchical way so that older version methods can be overridden by newer, and calls to a newer version of an unchanged method can be seamlessly fallen back to it’s earlier version.
So back to our example we could build up a new version of the create method so that the API would look like this:
1 2 3 4 5 6 7 8 9 10 11 12 13 14 15 16 17 18 19 20 21 22 23 | @Path("/api/v1/appointments") //We add a version to our base path public class AppointmentsAPIv1 { //We add the version to our API classes @GET @Path("/{id}") public AppointmentDTO getAppointment(@PathParam("id") String id) { ... } @POST public void createAppointment(AppointmentDTO appointment) { //Your old way of creating Appointments only with names } } //New API class that extends the previous version @Path("/api/v2/appointments") public class AppointmentsAPIv2 extends AppointmentsAPIv1 { @POST @Override public void createAppointment(AppointmentDTO appointment) { //Your new way of creating appointments with guests } } |
So now we have 2 working versions of our API. While all the old clients that didn’t yet upgrade to the new version will continue to use v1 – and will see no changes – all your new consumers can now use the latest v2. Note that all these calls are valid:
| Call | Result |
|---|
|
GET /api/v1/appointments/123 | Will run getAppointment on the v1 class |
|
GET /api/v2/appointments/123 | Will run getAppointment on the v1 class |
|
POST /api/v1/appointments | Will run createAppointment on the v1 class |
|
POST /api/v2/appointments | Will run createAppointment on the v2 class |
This way any consumers that want to start using the latest version will only have to update their base URLs to the corresponding version, and all of the API will seamlessly shift to the most recent implementations, while keeping the old unchanged ones.
Caveat
For the keen eye there is an immediate caveat with this approach. If your API consists of tenths of different classes, a newer version would imply duplicating them all to an upper version even for those where you don’t actually have any changes. It’s a bit of boiler plate code that can be mostly auto-generated. Still annoying though.
Although there is no quick way to overcome this, the use of interfaces could help. Instead of creating a new implementation class you could simply create a new Path annotated interface and have it implemented in your current implementing class. Although you would sill have to create one interface per API class, it is a bit cleaner. It helps a little bit, but it’s still a caveat.
Final thoughts
API versioning seems to be a current hot topic. Lot of different angles and opinions exists but there seems to be a lack of standard best practices. While this post doesn’t aim to provide such I hope that it helps to achieve a better API structure and contribute to it’s maintainability.
A final word goes to Roberto Cortez for encouraging and allowing this post on his blog. This is actually my first blog post so load the cannons and fire at will. 😉
When building a system, developers usually disregard the security aspects. Security has been always something very important to worry about, but it’s attracting even higher concerns than before. Just this year we had a few cases like the Heartbleed Bug or the CelebrityGate scandal. This has nothing to do with the post, but are just examples that security really matters and we should be aware of it.
With the increasing popularity of REST services it makes sense that these need to be secured in some way. A couple of weeks ago, I had to integrate my client with a REST service behind https. I have never done it before and that’s the reason for this post. I have to confess that I’m no security expert myself, so please correct me if I write anything stupid.
The Setup
For this example I have used the following setup:
I’m not going into many details about SSL and TSL, so please check here for additional content. Note that TLS is the new name for SSL evolution. Sometimes there is confusion between the two and people often say SSL, but use the newest version of TSL. Keep that in mind.
Don’t forget to follow the instructions on the following page to setup SSL for Tomcat: SSL Configuration HOW-TO. This is needed for the server to present the client with a set of credentials, a Certificate, to secure the connection between server and client.
The Code
Service
Let’s create a simple Spring REST Service:
RestService.java
| @Controller @RequestMapping("/") public class RestService { @RequestMapping(method = RequestMethod.GET) @ResponseBody public String get() { return "Called the get Rest Service"; } } |
And we also need some wiring for this to work:
RestConfig.java
| @Configuration @EnableWebMvc @ComponentScan(basePackages = "com.radcortez.rest.ssl") public class RestConfig {} |
web.xml
1 2 3 4 5 6 7 8 9 10 11 12 13 14 15 16 17 18 19 20 21 22 23 24 25 26 27 28 29 30 31 32 33 34 35 36 37 | <?xml version="1.0" encoding="UTF-8"?> <web-app version="3.1" xmlns="http://xmlns.jcp.org/xml/ns/javaee" xmlns:xsi="http://www.w3.org/2001/XMLSchema-instance" xsi:schemaLocation="http://xmlns.jcp.org/xml/ns/javaee http://xmlns.jcp.org/xml/ns/javaee/web-app_3_1.xsd"> <servlet> <servlet-name>rest</servlet-name> <servlet-class>org.springframework.web.servlet.DispatcherServlet</servlet-class> <init-param> <param-name>contextClass</param-name> <param-value>org.springframework.web.context.support.AnnotationConfigWebApplicationContext</param-value> </init-param> <init-param> <param-name>contextConfigLocation</param-name> <param-value>com.radcortez.rest.ssl</param-value> </init-param> <load-on-startup>1</load-on-startup> </servlet> <servlet-mapping> <servlet-name>rest</servlet-name> <url-pattern>/</url-pattern> </servlet-mapping> <security-constraint> <web-resource-collection> <web-resource-name>Rest Application</web-resource-name> <url-pattern>/*</url-pattern> </web-resource-collection> <user-data-constraint> <!-- Needed for our application to respond to https requests --> <transport-guarantee>CONFIDENTIAL</transport-guarantee> </user-data-constraint> </security-constraint> </web-app> |
Please, note the elements security-constraint, user-data-constraint and <transport-guarantee>CONFIDENTIAL</transport-guarantee>. These are needed to specify that the application requires a secure connection. Check Securing Web Applications for Java Applications.
Running the Service
Just deploy the application on the TomEE Server using your favourite IDE environment and access https://localhost:8443/. You should get the following (you might need to accept the server certificate first):

Note that the browser protocol is https and the port is 8443 (assuming that you kept the default settings in SSL Configuration HOW-TO.
Client
Now, if you try to call this REST service with a Java client, most likely you are going to get the following message and Exception (or similar):
Message: I/O error on GET request for “https://localhost:8443/”:sun.security.validator.ValidatorException:
Exception: Caused by: javax.net.ssl.SSLHandshakeException: sun.security.validator.ValidatorException: PKIX path building failed: sun.security.provider.certpath.SunCertPathBuilderException: unable to find valid certification path to requested target
This happens because the running JDK does not have a valid certificate for your server. You can import it, and get rid of the problem, but let’s do something more interesting. We are going to programatically supply a trusted keystore with our server certificate.
This is especially useful if:
- you are running your code into multiple environments
- you don’t have to manually import the certificate into the JDK every time
- if you upgrade the JDK you have to remember about the certificates
- for some odd reason you don’t have access to the JDK itself to import the certificate
Let’s write some code:
RestClientConfig.java
1 2 3 4 5 6 7 8 9 10 11 12 13 14 15 16 17 18 19 20 21 22 23 24 25 26 27 28 29 30 31 32 33 34 35 36 37 | @Configuration @PropertySource("classpath:config.properties") public class RestClientConfig { @Bean public RestOperations restOperations(ClientHttpRequestFactory clientHttpRequestFactory) throws Exception { return new RestTemplate(clientHttpRequestFactory); } @Bean public ClientHttpRequestFactory clientHttpRequestFactory(HttpClient httpClient) { return new HttpComponentsClientHttpRequestFactory(httpClient); } @Bean public HttpClient httpClient(@Value("${keystore.file}") String file, @Value("${keystore.pass}") String password) throws Exception { KeyStore trustStore = KeyStore.getInstance(KeyStore.getDefaultType()); FileInputStream instream = new FileInputStream(new File(file)); try { trustStore.load(instream, password.toCharArray()); } finally { instream.close(); } SSLContext sslcontext = SSLContexts.custom().loadTrustMaterial(trustStore, new TrustSelfSignedStrategy()).build(); SSLConnectionSocketFactory sslsf = new SSLConnectionSocketFactory(sslcontext, new String[]{"TLSv1.2"}, null, BROWSER_COMPATIBLE_HOSTNAME_VERIFIER); return HttpClients.custom().setSSLSocketFactory(sslsf).build(); } @Bean public static PropertySourcesPlaceholderConfigurer propertySourcesPlaceholderConfigurer() { return new PropertySourcesPlaceholderConfigurer(); } } |
Here we use Spring RestOperations interface which specified a basic set of RESTful operations. Next we use Apache HTTP Components SSLConnectionSocketFactory which gives us the ability to validate the identity of the server against a list of trusted certificates. The certificate is loaded from the same file used on the server by KeyStore.
RestServiceClientIT.java
| @RunWith(SpringJUnit4ClassRunner.class) @ContextConfiguration(classes = RestClientConfig.class) public class RestServiceClientIT { @Autowired private RestOperations rest; @Test public void testRestRequest() throws Exception { ResponseEntity<String> response = rest.getForEntity("https://localhost:8443/", String.class); System.out.println("response = " + response); System.out.println("response.getBody() = " + response.getBody()); } } |
A simple test class. We also need a properties file with the keystore file location and password:
config.properties
| keystore.file=${user.home}/.keystore keystore.pass=changeit |
This should work fine if you used all the defaults.
Running the Test
If you now run the test which invokes the REST service within a Java client, you should get the following output:
Response: <200 OK,Called the get Rest Service,{Server=[Apache-Coyote/1.1], Cache-Control=[private], Expires=[Thu, 01 Jan 1970 01:00:00 WET], Content-Type=[text/plain;charset=ISO-8859-1], Content-Length=[27], Date=[Tue, 23 Dec 2014 01:29:20 GMT]}>
Body: Called the get Rest Service
Conclusion
That’s it! You can now call your REST service with your client in a secured manner. If you prefer to add the certificate to the JDK keystore, please check this post.
Stay tuned for an equivalent for Java EE JAX-RS equivalent.
Resources
You can clone a full working copy from my github repository: REST SSL.
This is the promised follow up to the Java EE 7 with Angular JS – Part 1. It took longer than I expect (to find the time to prepare the code and blog post), but it’s finally here!
The Application
The original application in Part 1 it’s only a simple list with pagination and a REST service that feeds the list data.

In this post we’re going to add CRUD (Create, Read, Update, Delete) capabilities, bind REST services to perform these operations on the server side and validate the data.
The Setup
The Setup is the same from Part 1, but here is the list for reference:
The Code
Backend – Java EE 7
The backend does not required many changes. Since we want the ability to create, read, update and delete, we need to add the appropriate methods in the REST service to perform these operations:
1 2 3 4 5 6 7 8 9 10 11 12 13 14 15 16 17 18 19 20 21 22 23 24 25 26 27 28 29 30 31 32 33 34 35 36 37 38 39 40 41 42 43 44 45 46 47 48 49 50 51 52 53 54 55 56 57 58 59 60 61 62 63 64 65 66 67 68 69 70 71 72 73 74 75 76 77 78 79 80 81 82 83 84 85 86 87 88 89 90 91 92 93 94 95 | package com.cortez.samples.javaee7angular.rest; import com.cortez.samples.javaee7angular.data.Person; import com.cortez.samples.javaee7angular.pagination.PaginatedListWrapper; import javax.ejb.Stateless; import javax.persistence.EntityManager; import javax.persistence.PersistenceContext; import javax.persistence.Query; import javax.ws.rs.*; import javax.ws.rs.core.Application; import javax.ws.rs.core.MediaType; import java.util.List; @Stateless @ApplicationPath("/resources") @Path("persons") @Consumes(MediaType.APPLICATION_JSON) @Produces(MediaType.APPLICATION_JSON) public class PersonResource extends Application { @PersistenceContext private EntityManager entityManager; private Integer countPersons() { Query query = entityManager.createQuery("SELECT COUNT(p.id) FROM Person p"); return ((Long) query.getSingleResult()).intValue(); } @SuppressWarnings("unchecked") private List<Person> findPersons(int startPosition, int maxResults, String sortFields, String sortDirections) { Query query = entityManager.createQuery("SELECT p FROM Person p ORDER BY " + sortFields + " " + sortDirections); query.setFirstResult(startPosition); query.setMaxResults(maxResults); return query.getResultList(); } private PaginatedListWrapper<Person> findPersons(PaginatedListWrapper<Person> wrapper) { wrapper.setTotalResults(countPersons()); int start = (wrapper.getCurrentPage() - 1) * wrapper.getPageSize(); wrapper.setList(findPersons(start, wrapper.getPageSize(), wrapper.getSortFields(), wrapper.getSortDirections())); return wrapper; } @GET public PaginatedListWrapper<Person> listPersons(@DefaultValue("1") @QueryParam("page") Integer page, @DefaultValue("id") @QueryParam("sortFields") String sortFields, @DefaultValue("asc") @QueryParam("sortDirections") String sortDirections) { PaginatedListWrapper<Person> paginatedListWrapper = new PaginatedListWrapper<>(); paginatedListWrapper.setCurrentPage(page); paginatedListWrapper.setSortFields(sortFields); paginatedListWrapper.setSortDirections(sortDirections); paginatedListWrapper.setPageSize(10); return findPersons(paginatedListWrapper); } @GET @Path("{id}") public Person getPerson( @PathParam("id") Long id) { return entityManager.find(Person.class, id); } @POST public Person savePerson(Person person) { if (person.getId() == null) { Person personToSave = new Person(); personToSave.setName(person.getName()); personToSave.setDescription(person.getDescription()); personToSave.setImageUrl(person.getImageUrl()); entityManager.persist(person); } else { Person personToUpdate = getPerson(person.getId()); personToUpdate.setName(person.getName()); personToUpdate.setDescription(person.getDescription()); personToUpdate.setImageUrl(person.getImageUrl()); person = entityManager.merge(personToUpdate); } return person; } @DELETE @Path("{id}") public void deletePerson(@PathParam("id") Long id) { entityManager.remove(getPerson(id)); } } |
The code is exactly as a normal Java POJO, but using the Java EE annotations to enhance the behaviour. @ApplicationPath("/resources") and @Path("persons") will expose the REST service at the url yourdomain/resources/persons (yourdomain will be the host where the application is running). @Consumes(MediaType.APPLICATION_JSON) and @Produces(MediaType.APPLICATION_JSON) accept and format REST request and response as JSON.
For the REST operations:
| Annotation / HTTP Method | Java Method | URL | Behaviour |
|---|
@GET / GET | listPersons | http://yourdomain/resources/persons | Returns a paginated list of 10 persons. |
@GET / GET | getPerson | http://yourdomain/resources/persons/{id} | Returns a Person entity by it’s id. |
@POST / POST | savePerson | http://yourdomain/resources/persons | Creates or Updates a Person. |
@DELETE / DELETE | deletePerson | http://yourdomain/resources/persons/{id} | Deletes a Person entity by it’s id. |
The url invoked for each operations is very similar. The magic to distinguish which operation needs to be called is defined in the HTTP method itself when the request is submitted. Check HTTP Method definitions.
For getPerson and deletePerson note that we added the annotation @Path("{id}") which defines an optional path to call the service. Since we need to know which object we want to get or delete, we need to indicate the id somehow. This is done in the service url to be called, so if we want to delete the Person with id 1, we would call http://yourdomain/resources/persons/1 with the HTTP method DELETE.
That’s it for the backend stuff. Only 30 lines of code added to the old REST service. I have also added a new property to the Person object, to hold a link to image with the purpose of displaying an avatar of the person.
UI – Angular JS
For the UI part, I’ve decided to split it into 3 sections: the grid, the form and the feedback messages sections, each with its own Angular controller. The grid is mostly the same from Part 1, but it did require some tweaks for the new stuff:
Grid HTML
| <!-- Specify a Angular controller script that binds Javascript variables to the grid.--> <div class="grid" ng-controller="personsListController"> <div> <h3>List Persons</h3> </div> <!-- Binds the grid component to be displayed. --> <div class="gridStyle" ng-grid="gridOptions"></div> <!-- Bind the pagination component to be displayed. --> <pagination direction-links="true" boundary-links="true" total-items="persons.totalResults" items-per-page="persons.pageSize" ng-model="persons.currentPage" ng-change="refreshGrid()"> </pagination> </div> |
Nothing special here. Pretty much the same as Part 1.
Grid Angular Controller
1 2 3 4 5 6 7 8 9 10 11 12 13 14 15 16 17 18 19 20 21 22 23 24 25 26 27 28 29 30 31 32 33 34 35 36 37 38 39 40 41 42 43 44 45 46 47 48 49 50 51 52 53 54 55 56 57 58 59 60 61 62 63 64 65 66 67 68 69 | app.controller('personsListController', function ($scope, $rootScope, personService) { // Initialize required information: sorting, the first page to show and the grid options. $scope.sortInfo = {fields: ['id'], directions: ['asc']}; $scope.persons = {currentPage: 1}; $scope.gridOptions = { data: 'persons.list', useExternalSorting: true, sortInfo: $scope.sortInfo, columnDefs: [ { field: 'id', displayName: 'Id' }, { field: 'name', displayName: 'Name' }, { field: 'description', displayName: 'Description' }, { field: '', width: 30, cellTemplate: '<span class="glyphicon glyphicon-remove remove" ng-click="deleteRow(row)"></span>' } ], multiSelect: false, selectedItems: [], // Broadcasts an event when a row is selected, to signal the form that it needs to load the row data. afterSelectionChange: function (rowItem) { if (rowItem.selected) { $rootScope.$broadcast('personSelected', $scope.gridOptions.selectedItems[0].id); } } }; // Refresh the grid, calling the appropriate rest method. $scope.refreshGrid = function () { var listPersonsArgs = { page: $scope.persons.currentPage, sortFields: $scope.sortInfo.fields[0], sortDirections: $scope.sortInfo.directions[0] }; personService.get(listPersonsArgs, function (data) { $scope.persons = data; }) }; // Broadcast an event when an element in the grid is deleted. No real deletion is perfomed at this point. $scope.deleteRow = function (row) { $rootScope.$broadcast('deletePerson', row.entity.id); }; // Watch the sortInfo variable. If changes are detected than we need to refresh the grid. // This also works for the first page access, since we assign the initial sorting in the initialize section. $scope.$watch('sortInfo.fields[0]', function () { $scope.refreshGrid(); }, true); // Do something when the grid is sorted. // The grid throws the ngGridEventSorted that gets picked up here and assigns the sortInfo to the scope. // This will allow to watch the sortInfo in the scope for changed and refresh the grid. $scope.$on('ngGridEventSorted', function (event, sortInfo) { $scope.sortInfo = sortInfo; }); // Picks the event broadcasted when a person is saved or deleted to refresh the grid elements with the most // updated information. $scope.$on('refreshGrid', function () { $scope.refreshGrid(); }); // Picks the event broadcasted when the form is cleared to also clear the grid selection. $scope.$on('clear', function () { $scope.gridOptions.selectAll(false); }); }); |
A few more attributes are required to configure the behaviour of the grid. The important bits are the data: 'persons.list' which binds the grid data to Angular model value $scope.persons, the columnDefs which allow us to model the grid as we see fit. Since I wanted to add an option to delete each row, I needed to add a new cell which call the function deleteRow when you click in cross icon. The afterSelectionChanges function is required to update the form data with the person selected in the grid. You can check other grid options here.
The rest of the code is self-explanatory and there is also a few comments in there. A special note about $rootScope.$broadcast: this is used to dispatch an event to all the other controllers. This is a way to communicate between controllers, since the grid, form and feedback messages have separate controllers. If everything was in only one controller, this was not required and a simple function call would be enough. Another possible solution if we want to keep the multiple controllers, would be to use Angular services. The used approach seems much cleaner since it separates the application concerns and does not require you to implement additional Angular services, but it might be a little harder to debug if needed.
Form HTML
1 2 3 4 5 6 7 8 9 10 11 12 13 14 15 16 17 18 19 20 21 22 23 24 25 26 27 28 29 30 31 32 33 34 35 36 37 38 39 40 41 42 43 44 45 46 47 48 49 50 51 52 53 54 55 56 57 58 59 60 61 62 63 64 65 66 67 68 69 70 71 72 73 | <div class="form" ng-controller="personsFormController"> <!-- Verify person, if there is no id present, that we are Adding a Person --> <div ng-if="person.id == null"> <h3>Add Person</h3> </div> <!-- Otherwise it's an Edit --> <div ng-if="person.id != null"> <h3>Edit Person</h3> </div> <div> <!-- Specify the function to be called on submit and disable HTML5 validation, since we're using Angular validation--> <form name="personForm" ng-submit="updatePerson()" novalidate> <!-- Display an error if the input is invalid and is dirty (only when someone changes the value) --> <div class="form-group" ng-class="{'has-error' : personForm.name.$invalid && personForm.name.$dirty}"> <label for="name">Name:</label> <!-- Display a check when the field is valid and was modified --> <span ng-class="{'glyphicon glyphicon-ok' : personForm.name.$valid && personForm.name.$dirty}"></span> <input id="name" name="name" type="text" class="form-control" maxlength="50" ng-model="person.name" required ng-minlength="2" ng-maxlength="50"/> <!-- Validation messages to be displayed on required, minlength and maxlength --> <p class="help-block" ng-show="personForm.name.$error.required">Add Name.</p> <p class="help-block" ng-show="personForm.name.$error.minlength">Name must be at least 2 characters long.</p> <p class="help-block" ng-show="personForm.name.$error.maxlength">Name cannot be longer than 50 characters.</p> </div> <!-- Display an error if the input is invalid and is dirty (only when someone changes the value) --> <div class="form-group" ng-class="{'has-error' : personForm.description.$invalid && personForm.description.$dirty}"> <label for="description">Description:</label> <!-- Display a check when the field is valid and was modified --> <span ng-class="{'glyphicon glyphicon-ok' : personForm.description.$valid && personForm.description.$dirty}"></span> <input id="description" name="description" type="text" class="form-control" maxlength="100" ng-model="person.description" required ng-minlength="5" ng-maxlength="100"/> <!-- Validation messages to be displayed on required, minlength and maxlength --> <p class="help-block" ng-show="personForm.description.$error.required">Add Description.</p> <p class="help-block" ng-show="personForm.description.$error.minlength">Description must be at least 5 characters long.</p> <p class="help-block" ng-show="personForm.description.$error.maxlength">Description cannot be longer than 100 characters.</p> </div> <!-- Display an error if the input is invalid and is dirty (only when someone changes the value) --> <div class="form-group" ng-class="{'has-error' : personForm.imageUrl.$invalid && personForm.imageUrl.$dirty}"> <label for="imageUrl">Image URL:</label> <!-- Display a check when the field is valid and was modified --> <span ng-class="{'glyphicon glyphicon-ok' : personForm.imageUrl.$valid && personForm.imageUrl.$dirty}"></span> <input id="imageUrl" name="imageUrl" type="url" class="form-control" maxlength="500" ng-model="person.imageUrl" required/> <!-- Validation messages to be displayed on required and invalid. Type 'url' makes checks to a proper url format. --> <p class="help-block" ng-show="personForm.imageUrl.$error.required">Add Image URL.</p> <p class="help-block" ng-show="personForm.imageUrl.$invalid && personForm.imageUrl.$dirty">Invalid Image URL.</p> </div> <div class="avatar" ng-if="person.imageUrl"> <img ng-src="{{person.imageUrl}}" width="400" height="250"/> </div> <!-- Form buttons. The 'Save' button is only enabled when the form is valid. --> <div class="buttons"> <button type="button" class="btn btn-primary" ng-click="clearForm()">Clear</button> <button type="submit" class="btn btn-primary" ng-disabled="personForm.$invalid">Save</button> </div> </form> </div> </div> |
Here is the looks:
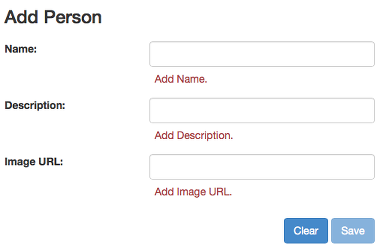
A lot of codeis for validation purposes, but lets look into this a bit more in detail: each input element binds its value to person.something. This allows to model the data between the HTML and the Javascript controller, so we can write $scope.person.name in our controller to get the value filled in the form input with name, name. To access the data inside the HTML form we use the form name personForm plus the name of the input field.
HTML5 have its own set of validations in the input fields, but we want to use the Angular ones. In that case, we need to disable form validations by using novalidate at the form element. Now, to use Angular validations, we can use a few Angular directives in the input elements. For this very basic form, we only use required, ng-minlength and ng-maxlength, but you can use others. Just look into the documentation.
Angular assigns CSS classes based on the input validation state. To have an idea, these are the possible values:
| State | CSS | On |
|---|
valid | ng-valid | When the field is valid. |
invalid | ng-invalid | When the field is invalid. |
pristine | ng-pristine | When the field was never touched before. |
dirty | ng-dirty | When the field is changed. |
These CSS classes are empty. You need to create them and assign them styles in an included CSS sheet for the application. Instead, we’re going to use styles from Bootstrap which are very nice. For them to work, a few additional classes need to be applied to the elements. The div element enclosing the input needs the CSS class form-group and the input element needs the CSS class form-control.
To display an invalid input field we add ng-class="{'has-error' : personForm.name.$invalid && personForm.name.$dirty}" to the containing input div. This code evaluates if the name in the personForm is invalid and if it’s dirty. It the condition verifies, then the input is displayed as invalid.
Finally, for the form validation messages we need to verify the $error directive for each of the inputs and types of validations being performed. Just add ng-show="personForm.name.$error.minlength" to an HTML display element with a message to warn the user that the name input field is too short.
Form Angular Controller
1 2 3 4 5 6 7 8 9 10 11 12 13 14 15 16 17 18 19 20 21 22 23 24 25 26 27 28 29 30 31 32 33 34 35 36 37 38 39 40 41 42 43 44 45 46 47 48 49 50 51 52 53 | // Create a controller with name personsFormController to bind to the form section. app.controller('personsFormController', function ($scope, $rootScope, personService) { // Clears the form. Either by clicking the 'Clear' button in the form, or when a successfull save is performed. $scope.clearForm = function () { $scope.person = null; // For some reason, I was unable to clear field values with type 'url' if the value is invalid. // This is a workaroud. Needs proper investigation. document.getElementById('imageUrl').value = null; // Resets the form validation state. $scope.personForm.$setPristine(); // Broadcast the event to also clear the grid selection. $rootScope.$broadcast('clear'); }; // Calls the rest method to save a person. $scope.updatePerson = function () { personService.save($scope.person).$promise.then( function () { // Broadcast the event to refresh the grid. $rootScope.$broadcast('refreshGrid'); // Broadcast the event to display a save message. $rootScope.$broadcast('personSaved'); $scope.clearForm(); }, function () { // Broadcast the event for a server error. $rootScope.$broadcast('error'); }); }; // Picks up the event broadcasted when the person is selected from the grid and perform the person load by calling // the appropiate rest service. $scope.$on('personSelected', function (event, id) { $scope.person = personService.get({id: id}); }); // Picks us the event broadcasted when the person is deleted from the grid and perform the actual person delete by // calling the appropiate rest service. $scope.$on('deletePerson', function (event, id) { personService.delete({id: id}).$promise.then( function () { // Broadcast the event to refresh the grid. $rootScope.$broadcast('refreshGrid'); // Broadcast the event to display a delete message. $rootScope.$broadcast('personDeleted'); $scope.clearForm(); }, function () { // Broadcast the event for a server error. $rootScope.$broadcast('error'); }); }); }); |
For the form controller, we need the two functions that perform the operations associated with the button Clear and the button Save which are self-explanatory. A quick note: for some reason, Angular does not clear input fields which are in invalid state. I did found a few people complaining about the same problem, but I need to investigate this further. Maybe it’s something I’m doing wrong.
REST services are called using save and delete from the $resource object which already implement the correspondent HTTP methods. Check the documentation. You can get a $resource with the following factory:
| // Service that provides persons operations app.factory('personService', function ($resource) { return $resource('resources/persons/:id'); }); |
The rest of the controller code, are functions to pickup the events created by the grid to load the person data in the form and delete the person. This controller also create a few events. If we add or remove persons, the grid needs to be updated so an event is generated requesting the grid to be updated.
Feedback Messages HTML
| <!-- Specify a Angular controller script that binds Javascript variables to the feedback messages.--> <div class="message" ng-controller="alertMessagesController"> <alert ng-repeat="alert in alerts" type="{{alert.type}}" close="closeAlert($index)">{{alert.msg}}</alert> </div> |
This is just the top section of the application, to display success or error messages based on save, delete or server error.
Feedback Messages Angular Controller
1 2 3 4 5 6 7 8 9 10 11 12 13 14 15 16 17 18 19 20 21 22 23 24 25 26 27 | // Create a controller with name alertMessagesController to bind to the feedback messages section. app.controller('alertMessagesController', function ($scope) { // Picks up the event to display a saved message. $scope.$on('personSaved', function () { $scope.alerts = [ { type: 'success', msg: 'Record saved successfully!' } ]; }); // Picks up the event to display a deleted message. $scope.$on('personDeleted', function () { $scope.alerts = [ { type: 'success', msg: 'Record deleted successfully!' } ]; }); // Picks up the event to display a server error message. $scope.$on('error', function () { $scope.alerts = [ { type: 'danger', msg: 'There was a problem in the server!' } ]; }); $scope.closeAlert = function (index) { $scope.alerts.splice(index, 1); }; }); |
This is the controller that push the messages to the view. Listens to the events created by the grid and the form controllers.
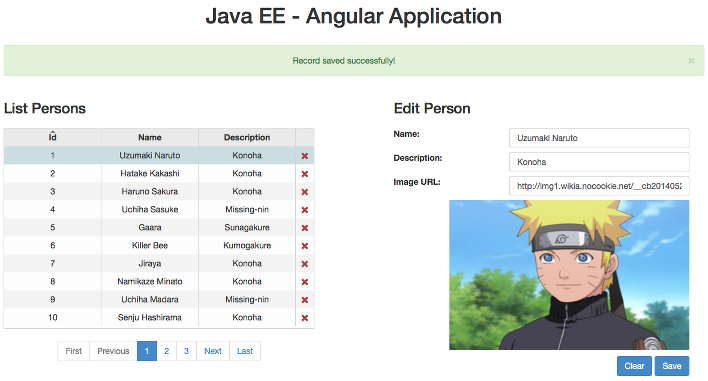
The End Result
Uff.. that was a lot of code and new information. Let’s see the final result:
There is also a live version running in http://javaee7-angular.radcortez.cloudbees.net, thanks to Cloudbees. It may take a while to open if the cloud instances is hibernated (because of no usage).
Unfortunately, Cloudbees stopped application hosting, but you can try using Codenvy in the following URL: https://codenvy.com/f?id=3qe4qr7mb8i86lpe. Check the post: Codenvy setup to demo applications using Docker: Java EE 7 with Angular.
Resources
You can clone a full working copy from my github repository and deploy it to Wildfly. You can find instructions there to deploy it. Should also work on Glassfish.
Java EE – Angular JS Source
Since I may modify the code in the future, you can download the original source of this post from the release 3.0. In alternative, clone the repo and checkout the tag from release 3.0 with the following command: git checkout 3.0.
Check also:
Final Thoughts
- The form validation kicks in right after you start typing. Angular 1.3 will have an on blur property to validate only after loosing focus, but I’m still using Angular 1.2.x.
- I have to confess that I found the validation code a bit too verbose. I don’t know if there is a way to simplify it, but you shouldn’t need to add each message validation to each input.
- A few things are still lacking here, like parameters sanitisation or server side validation. I’ll cover those in a next blog post.
This was a very long post, actually the longest I’ve wrote on my blog. If you reached this far, thank you so much for your time reading this post. I hope you enjoyed it! Let me know if you have any comments.
Today’s post will show you how to build a very simple application using Java EE 7 and Angular JS. Before going there let me tell you a brief story:
I have to confess that I was never a big fan of Javascript, but I still remember the first time I have used it. I don’t remember the year exactly, but probably around mid 90’s. I had a page with 3 frames (yes frames! remember those? very popular around that time) and I wanted to reload 2 frames when I clicked a link on the 3rd frame. At the time, Javascript was used to do some fancy stuff on webpages, not every browser have Javascript support and some even required you to turn it on. Fast forwarding to today the landscaped changed dramatically. Javascript is a full development stack now and you can develop entire applications written only in Javascript. Unfortunately for me, sometimes I still think I’m back in the 90’s and don’t give enough credit to Javascript, so this is my attempt to get to know Javascript better.
Why Java EE 7?
Well, I like Java and the new Java EE version is pretty good. Less verbose and very fast using Wildfly or Glassfish. It provides you with a large set of specifications to suit your needs and it’s a standard in the Java world.
Why Angular JS?
I’m probably following the big hype around Angular here. Since I don’t have much experience with Javascript I don’t know the offers very well, so I’m just following advice of some friends and I have also noticed a big acceptance of Angular in the last Devoxx. Every room with an Angular talk was full, so I wanted to give it a try and found out for myself.
The Application
For the application, it’s a simple list with pagination and a REST service that feeds the list data. Every time I start a new enterprise project it’s usually the first thing we code: create a table, store some data and list some random data, so I think it’s appropriate.
The Setup
The Code (finally!)
Backend – Java EE 7
Starting with the backend, let’s define a very simple Entity class (some code is omitted for simplicity):
| @Entity public class Person { @Id private Long id; private String name; private String description; } |
If you’re not familiar with Java EE JPA specification, this will allow to model an object class into a database table by using the annotation @Entity to connect to the database table with the same name and the annotation @Id to identify the table primary key.
Following by a persistence.xml:
| <?xml version="1.0" encoding="UTF-8"?> <persistence version="2.1" xmlns="http://xmlns.jcp.org/xml/ns/persistence" xmlns:xsi="http://www.w3.org/2001/XMLSchema-instance" xsi:schemaLocation="http://xmlns.jcp.org/xml/ns/persistence http://xmlns.jcp.org/xml/ns/persistence/persistence_2_1.xsd"> <persistence-unit name="myPU" transaction-type="JTA"> <properties> <property name="javax.persistence.schema-generation.database.action" value="drop-and-create"/> <property name="javax.persistence.schema-generation.create-source" value="script"/> <property name="javax.persistence.schema-generation.drop-source" value="script"/> <property name="javax.persistence.schema-generation.create-script-source" value="sql/create.sql"/> <property name="javax.persistence.schema-generation.drop-script-source" value="sql/drop.sql"/> <property name="javax.persistence.sql-load-script-source" value="sql/load.sql"/> </properties> </persistence-unit> </persistence> |
Two of my favourite new features on Java EE 7: now you can run sql in a standard way by using the properties javax.persistence.schema-generation.* and it also binds you to a default datasource if you don’t provide one. So for this case, it’s going to use the internal Wildfly H2 database for our application.
Finally, to provide the list data we need to query the database and expose it as a REST service:
1 2 3 4 5 6 7 8 9 10 11 12 13 14 15 16 17 18 19 20 21 22 23 24 25 26 27 28 29 30 31 32 33 34 35 36 37 38 39 40 41 42 43 44 45 46 47 48 49 | @Stateless @ApplicationPath("/resources") @Path("persons") public class PersonResource extends Application { @PersistenceContext private EntityManager entityManager; private Integer countPersons() { Query query = entityManager.createQuery("SELECT COUNT(p.id) FROM Person p"); return ((Long) query.getSingleResult()).intValue(); } @SuppressWarnings("unchecked") private List<Person> findPersons(int startPosition, int maxResults, String sortFields, String sortDirections) { Query query = entityManager.createQuery("SELECT p FROM Person p ORDER BY " + sortFields + " " + sortDirections); query.setFirstResult(startPosition); query.setMaxResults(maxResults); return query.getResultList(); } public PaginatedListWrapper<Person> findPersons(PaginatedListWrapper<Person> wrapper) { wrapper.setTotalResults(countPersons()); int start = (wrapper.getCurrentPage() - 1) * wrapper.getPageSize(); wrapper.setList(findPersons(start, wrapper.getPageSize(), wrapper.getSortFields(), wrapper.getSortDirections())); return wrapper; } @GET @Produces(MediaType.APPLICATION_JSON) public PaginatedListWrapper<Person> listPersons(@DefaultValue("1") @QueryParam("page") Integer page, @DefaultValue("id") @QueryParam("sortFields") String sortFields, @DefaultValue("asc") @QueryParam("sortDirections") String sortDirections) { PaginatedListWrapper<Person> paginatedListWrapper = new PaginatedListWrapper<>(); paginatedListWrapper.setCurrentPage(page); paginatedListWrapper.setSortFields(sortFields); paginatedListWrapper.setSortDirections(sortDirections); paginatedListWrapper.setPageSize(5); return findPersons(paginatedListWrapper); } } |
The code is exactly as a normal Java POJO, but using the Java EE annotations to enhance the behaviour. @ApplicationPath("/resources") and @Path("persons") will expose the REST service at the url yourdomain/resources/persons, @GET marks the logic to be called by the http GET method and @Produces(MediaType.APPLICATION_JSON) formats the REST response as JSON format. Pretty cool with only a few annotations.
To make it a little easier to exchange the needed information for the paginated list, I have also created the following wrapper class:
| public class PaginatedListWrapper<T> { private Integer currentPage; private Integer pageSize; private Integer totalResults; private String sortFields; private String sortDirections; private List<T> list; } |
And we are done with the backend stuff.
UI – Angular JS
To display the data we are going to use Angular JS. Angular extends the traditional HTML with additional custom tag attributes to bind data represented in Javascript variables by following a MVC approach. So, lets look to our html page:
1 2 3 4 5 6 7 8 9 10 11 12 13 14 15 16 17 18 19 20 21 22 23 24 25 26 27 28 29 30 31 32 33 34 35 36 37 | <!DOCTYPE html> <!-- Declares the root element that allows behaviour to be modified through Angular custom HTML tags. --> <html ng-app="persons"> <head> <title></title> <script src="lib/angular.min.js"></script> <script src="lib/jquery-1.9.1.js"></script> <script src="lib/ui-bootstrap-0.10.0.min.js"></script> <script src="lib/ng-grid.min.js"></script> <script src="script/person.js"></script> <link rel="stylesheet" type="text/css" href="lib/bootstrap.min.css"/> <link rel="stylesheet" type="text/css" href="lib/ng-grid.min.css"/> <link rel="stylesheet" type="text/css" href="css/style.css"/> </head> <body> <br> <div class="grid"> <!-- Specify a JavaScript controller script that binds Javascript variables to the HTML.--> <div ng-controller="personsList"> <!-- Binds the grid component to be displayed. --> <div class="gridStyle" ng-grid="gridOptions"></div> <!-- Bind the pagination component to be displayed. --> <pagination direction-links="true" boundary-links="true" total-items="persons.totalResults" page="persons.currentPage" items-per-page="persons.pageSize" on-select-page="refreshGrid(page)"> </pagination> </div> </div> </body> </html> |
Apart from the Javascript and CSS declarations there is very little code in there. Very impressive. Angular also have a wide range of ready to use components, so I’m using the ng-grid to display the data and UI Bootstrap that provides a pagination component. The ng-grid also have a pagination component, but I liked the UI Bootstrap pagination component more.
There is something still missing. The Javascript file where everything happens:
1 2 3 4 5 6 7 8 9 10 11 12 13 14 15 16 17 18 19 20 21 22 23 24 25 26 27 28 29 30 31 32 33 34 35 36 37 38 39 40 | var app = angular.module('persons', ['ngGrid', 'ui.bootstrap']); // Create a controller with name personsList to bind to the html page. app.controller('personsList', function ($scope, $http) { // Makes the REST request to get the data to populate the grid. $scope.refreshGrid = function (page) { $http({ url: 'resources/persons', method: 'GET', params: { page: page, sortFields: $scope.sortInfo.fields[0], sortDirections: $scope.sortInfo.directions[0] } }).success(function (data) { $scope.persons = data; }); }; // Do something when the grid is sorted. // The grid throws the ngGridEventSorted that gets picked up here and assigns the sortInfo to the scope. // This will allow to watch the sortInfo in the scope for changed and refresh the grid. $scope.$on('ngGridEventSorted', function (event, sortInfo) { $scope.sortInfo = sortInfo; }); // Watch the sortInfo variable. If changes are detected than we need to refresh the grid. // This also works for the first page access, since we assign the initial sorting in the initialize section. $scope.$watch('sortInfo', function () { $scope.refreshGrid($scope.persons.currentPage); }, true); // Initialize required information: sorting, the first page to show and the grid options. $scope.sortInfo = {fields: ['id'], directions: ['asc']}; $scope.persons = {currentPage : 1}; $scope.gridOptions = { data: 'persons.list', useExternalSorting: true, sortInfo: $scope.sortInfo }; }); |
The Javascript code is very clean and organised. Notice how everything gets added to an app controller, allowing you to have multiple separation of concerns on your business logic. To implement the required behaviour we just need to add a few functions to refresh the list by calling our REST service and monitor the grid data to refresh the view. This is the end result:
Next Steps:
For the following posts related with these series, I’m planning to:
Resources
You can clone a full working copy from my github repository and deploy it to Wildfly. You can find instructions there to deploy it. Should also work on Glassfish.
Java EE – Angular JS Source
Update
In the meanwhile I have updated the original code with the post about Manage Javascript dependencies. Please, download the original source of this post from the release 1.0. You can also clone the repo, and checkout the tag from release 1.0 with the following command: git checkout 1.0.
I hope you enjoyed the post! Let me know if you have any comments about this.