Do you find yourself writing the same code over and over again? Maybe you’re already familiar with IntelliJ Live Templates feature. If that’s the case don’t go away. I’m going to demonstrate how to use them, but also the most interesting part is how to create your own Live Templates that can help you on your everyday coding.
For those not familiar with Live Templates, this feature allows you to quickly insert code fragments in your source code files and have the ability to replace or auto-complete sections of the template based on the current code context. IntelliJ already has a lot of templates that you can use right away after installing the IDE. You can have a look into the templates by using the shortcut CTRL+J/CMD+J:
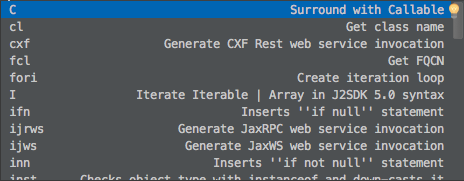
You get a list of the Live Templates that can be applied in the current context. The context is related with the file type you are editing (Java, SQL, XML, HTML, etc.), and also with the section itself (inside a method, field declaration, in the comments, etc). Let’s try one of the Live Templates I use the most, iterate an array. Did you notice the abbreviation on the left side of the Live Template popup? You can use it instead of using the popup shortcut. Just type iter followed by TAB key (do it inside the main method):

The Live Template gets expanded to the Java 5 for each loop and IntelliJ suggests you the args array from the main method in the iteration plus the element type being iterated. You can pick other arrays available in the context and the code will automatically adjust to your choice (look at the red square around the args, it can auto complete to other arrays using CTRL+SPACE). Pretty cool!
Other notable Live Templates that I find pretty useful:
| Abbreviation | Generated Code |
|---|
| psvm | public static void main(String[] args) {} |
| psfs | public static final String |
psf | public static final | | sout | System.out.println(); |
| soutv | System.out.println("var = " + $var); |
| St | String |
| ifn | if ($var == null) {} |
| inn | if ($var != null) {} |
Try to explore others that suit your programming style. Remember, Live Templates change with the file type you are editing. If you type udp in a SQL file and press TAB the abbreviation gets expanded to update set = where ;.
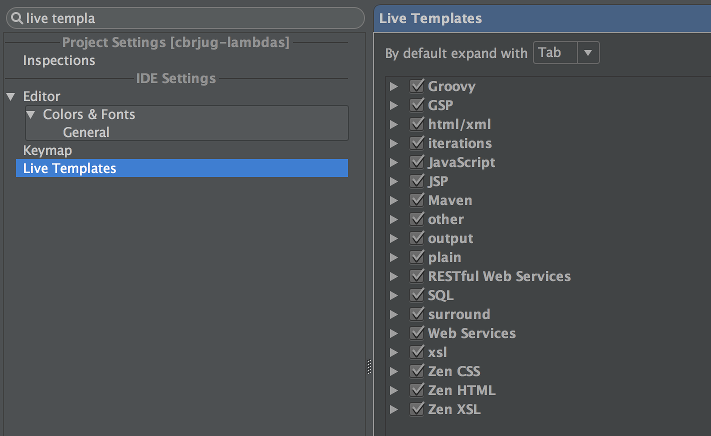
The real power is IntelliJ ability to create and customise your own code fragments. Lacking ideas? How about List<String> strings = new ArrayList<String>();? You type that a lot right? Well, maybe not with the String type, but that’s just an example. We’re going to create a Live Template for it where you can pick the type of the elements in the List. Go to IntelliJ Settings CTRL+ALT+S/CMD+, and search for Live Templates. You should get the following screen:
We can now add a new Live Template by pressing the + on the right upper corner of the screen. We now need to add an abbreviation, a description, the template text itself and pick the applicable contexts.
| Property | Value |
|---|
| Abbreviation | ls |
| Description | List |
| Template Text | List<$TYPE$> $VAR$ = new ArrayList<$TYPE$>(); |
| Applicable | Java: statement, declaration |

The $TYPE$ and $VAR$ are variables that you can replace on the Live Template generation using IntelliJ pre-defined functions. Go to Edit Variables screen and you should get a screen like this:

So expectedType() replaces the $TYPE$ variable with a class type with the default value of String and suggestVariableName() replace the $VAR$ variable with an auto suggestion for the variable name where the default value is list. Take a look into IntelliJ help and see which other predefined functions are available for you to use. You can even use Groovy code!
Now you can type ls in the editor and expand it with TAB. You will get:

You can auto-complete and replace String by another type. Notice how the rest of the template adjusts to your pick:

Note: If you’re using Java 7 or higher you can get rid of the generic type declaration on the right hand side of the template. I’m still working in a couple of projects that use Java 6, so I need it this way.
Now you just have to think on the code you type all the time and convert it to a Live Template and save precious time typing it! How about a template to create the Log instance to perform logging? You’re also going to need template log methods like sout to output log.info(""), log.error("") and so on. Try them out!
Feel free to share your Live Templates 🙂
Did you ever had the need to implement your own custom JAAS Principal and LoginModule for you JEE application? There are a couple of reasons for it. I’ve done it in the following cases:
- Authenticate the user using different strategies.
- Have additional user information on the Principal object.
- Share user information between applications using the Principal object.
Maybe you have your own specific reason, it doesn’t matter. Today’s post will guide you on how to do it for Wildfly. There are a few articles on the topic, but each of them deal with a different aspect of the problem. I got motivated to write this post to aggregate all the steps in a single article, including the Arquillian test.
Wildfly uses PicketBox for Java Application Security and already implements some handy classes to take care of the authentication of the user for you. Have a look into UsersRolesLoginModule, DatabaseServerLoginModule, LdapUsersLoginModule, BaseCertLoginModule and so on. Let’s start by creating a Maven project with the following dependency:
| <dependency> <groupId>org.picketbox</groupId> <artifactId>picketbox</artifactId> <version>4.0.20.Beta2</version> </dependency> |
Next, just create a CustomPrincipal and a CustomLoginModule classes:
| public class CustomPrincipal extends SimplePrincipal { private String description; public CustomPrincipal(String name, String description) { super(name); this.description = description; } public String getDescription() { return description; } public void setDescription(String description) { this.description = description; } } |
Note that we’re extending the org.jboss.security.SimplePrincipal present in PicketBox, but you can also implement java.security.Principal instead.
1 2 3 4 5 6 7 8 9 10 11 12 13 14 15 16 17 | public class CustomLoginModule extends UsersRolesLoginModule { private CustomPrincipal principal; @Override public boolean login() throws LoginException { boolean login = super.login(); if (login) { principal = new CustomPrincipal(getUsername(), "An user description!"); } return login; } @Override protected Principal getIdentity() { return principal != null ? principal : super.getIdentity(); } } |
Here again we’re extending a PicketBox class, org.jboss.security.auth.spi.UsersRolesLoginModule. You can code your own login module by implementing javax.security.auth.spi.LoginModule, but I recommend to extend one of the PicketBox classes, since they already have a lot of the behaviour that you will need. org.jboss.security.auth.spi.UsersRolesLoginModule is a very simple login module that authenticates an user by matching his login and password to a file. You shouldn’t use it for production applications, but it’s very handy for prototypes.
CustomLoginModule is also overriding two methods. These are needed to access our CustomPrincipal in a JEE application. The login() method as the name says is called when the user is performing the login action, so in here we create our CustomPrincipal object. On the other hand, the getIdentity() method is called to return the Principal that corresponds to the user primary identity, so we return our own instance if the login was successful.
Ok, great. How do we test it now? We use Arquillian, JUnit and HttpUnit. Start by adding the needed Maven dependencies (these are all the project dependencies):
1 2 3 4 5 6 7 8 9 10 11 12 13 14 15 16 17 18 19 20 21 22 23 24 25 26 27 28 29 30 31 32 33 34 35 36 37 38 39 40 41 42 43 44 45 46 47 48 49 50 51 52 53 54 55 56 57 58 59 60 61 62 63 64 65 66 67 | <dependencyManagement> <dependencies> <dependency> <groupId>org.jboss.arquillian</groupId> <artifactId>arquillian-bom</artifactId> <version>${arquillian.version}</version> <scope>import</scope> <type>pom</type> </dependency> </dependencies> </dependencyManagement> <dependencies> <dependency> <groupId>javax</groupId> <artifactId>javaee-api</artifactId> <version>7.0</version> <scope>provided</scope> </dependency> <dependency> <groupId>org.picketbox</groupId> <artifactId>picketbox</artifactId> <version>4.0.20.Beta2</version> </dependency> <dependency> <groupId>org.wildfly</groupId> <artifactId>wildfly-arquillian-container-remote</artifactId> <version>${wildfly.version}</version> <scope>test</scope> </dependency> <dependency> <groupId>org.jboss.arquillian.junit</groupId> <artifactId>arquillian-junit-container</artifactId> <scope>test</scope> </dependency> <dependency> <groupId>junit</groupId> <artifactId>junit</artifactId> <version>4.11</version> <scope>test</scope> </dependency> <dependency> <groupId>httpunit</groupId> <artifactId>httpunit</artifactId> <version>1.7</version> <scope>test</scope> </dependency> <dependency> <groupId>net.sourceforge.htmlunit</groupId> <artifactId>htmlunit</artifactId> <version>2.13</version> <scope>test</scope> </dependency> <dependency> <groupId>rhino</groupId> <artifactId>js</artifactId> <version>1.7R1</version> <scope>test</scope> </dependency> </dependencies> |
Note that we also included the javaee-api 7 dependency. Next, we’re creating a simple EJB to access our �C�ustomPrincipal and a Servlet to perform the authentication:
| @Stateless public class SampleEJB { @Resource private EJBContext ejbContext; @RolesAllowed("user") public String getPrincipalName() { return ejbContext.getCallerPrincipal().getName(); } } |
Now the Servlet:
1 2 3 4 5 6 7 8 9 10 11 12 13 14 15 16 17 18 19 20 21 22 23 24 25 26 27 28 29 30 31 32 33 34 35 36 | @WebServlet(urlPatterns = {"/LoginServlet"}) public class LoginServlet extends HttpServlet { @Inject private SampleEJB sampleEJB; @Override protected void doPost(HttpServletRequest request, HttpServletResponse response) throws ServletException, IOException { processRequest(request, response); } @Override protected void doGet(HttpServletRequest request, HttpServletResponse response) throws ServletException, IOException { processRequest(request, response); } private void processRequest(HttpServletRequest request, HttpServletResponse response) throws IOException { try { String username = request.getParameter("username"); String password = request.getParameter("password"); if (username != null && password != null) { request.login(username, password); } CustomPrincipal principal = (CustomPrincipal) request.getUserPrincipal(); response.getWriter().println("principal=" + request.getUserPrincipal().getClass().getSimpleName()); response.getWriter().println("username=" + sampleEJB.getPrincipalName()); response.getWriter().println("description=" + principal.getDescription()); } catch (ServletException e) { response.sendError(HttpServletResponse.SC_FORBIDDEN); } } } |
I think the code is self-explanatory, but we still need to wire everything together. The way we configure our login module to be used on Wildfly and on our application is by using Security Domains. You can add a Security Domain by hand using the standalone/configuration/standalone.xml and domain/configuration/domain.xml files on the Wildfly installation folder, but we’re going to do something more interesting.
Using the Command Line Interface (CLI), is really easy to make changes to the server configuration without modifying any XML. This also allows you to setup a test environment and clean up your changes in the end. To achieve that, create the following files:
jboss-add-login-module.cli
1 2 3 4 5 6 7 8 9 10 11 12 13 14 15 16 17 | connect /subsystem=security/security-domain=CustomSecurityDomain:add(cache-type=default) reload /subsystem=security/security-domain=CustomSecurityDomain/authentication=classic: \ add( \ login-modules=[{ \ "code"=>"com.cortez.wildfly.security.CustomLoginModule", \ "flag"=>"required", \ "module-options"=>[ \ ("usersProperties"=>"user.properties"), \ ("rolesProperties"=>"roles.properties")] \ }]) reload |
As you probably have guessed, jboss-add-login-module.cli contains the CLI commands to add our Security Domain to the Wildfly instance. We first add the Security Domain and then assign the login modules to the domain. Both commands should be able to be executed as a single command, but for some reason I was getting an error so I had to split them apart. The configuration is not available on the server unless you perform a reload command. For the login module, please note the FQN of our CustomLoginModule associated with the configuration. That’s how we wire the custom login module to the Security Domain. The configuration also references two other files: user.properties and roles.properties that are used to perform the user credential verification and load the user roles. Here are examples for both files:
user.properties
Define all valid usernames and their corresponding passwords.
roles.properties
Define the sets of roles for valid usernames.
We still need the CLI commands to remove the Security Domain at the cleanup phase:
jboss-remove-login-module.cli
| connect /subsystem=security/security-domain=CustomSecurityDomain:remove reload |
Almost done? Not yet! We still need to associate our Security Domain to our JEE application so our custom code runs when we perform authentication or execute Principal related behaviour. We need the following files now:
jboss-web.xml
| <?xml version="1.0" encoding="UTF-8"?> <jboss-web> <security-domain>CustomSecurityDomain</security-domain> </jboss-web> |
The previous file sets the Security Domain into Servlets.
jboss-ejb3.xml
1 2 3 4 5 6 7 8 9 10 11 12 13 14 15 16 17 | <?xml version="1.0" encoding="UTF-8"?> <jboss:jboss xmlns="http://java.sun.com/xml/ns/javaee" xmlns:jboss="http://www.jboss.com/xml/ns/javaee" xmlns:xsi="http://www.w3.org/2001/XMLSchema-instance" xmlns:s="urn:security:1.1" version="3.1" impl-version="2.0"> <assembly-descriptor> <s:security> <!-- Even wildcard * is supported --> <ejb-name>SampleEJB</ejb-name> <!-- Name of the security domain which is configured in the EJB3 subsystem --> <s:security-domain>CustomSecurityDomain</s:security-domain> </s:security> </assembly-descriptor> </jboss:jboss> |
This file sets the Security Domain in EJB’s.
Uff! Now we’re finally ready to see some action! We required a bit of setup to have this example working! Here is the test class:
1 2 3 4 5 6 7 8 9 10 11 12 13 14 15 16 17 18 19 20 21 22 23 24 25 26 27 28 29 30 31 32 33 34 35 36 37 38 39 40 41 42 43 44 45 46 47 48 49 50 51 52 53 54 55 56 57 58 59 | @RunWith(Arquillian.class) public class CustomLoginModuleTest { @ArquillianResource private URL deployUrl; @AfterClass public static void removeSecurityDomain() { processCliFile(new File("src/test/resources/jboss-remove-login-module.cli")); } @Deployment(testable = false) public static WebArchive createDeployment() { processCliFile(new File("src/test/resources/jboss-add-login-module.cli")); WebArchive war = ShrinkWrap.create(WebArchive.class) .addClass(CustomPrincipal.class) .addClass(CustomLoginModule.class) .addClass(SampleEJB.class) .addClass(LoginServlet.class) .addAsWebInfResource("jboss-web.xml") .addAsWebInfResource("jboss-ejb3.xml") .addAsResource("user.properties") .addAsResource("roles.properties"); System.out.println(war.toString(true)); return war; } @Test public void testLogin() throws IOException, SAXException { WebConversation webConversation = new WebConversation(); GetMethodWebRequest request = new GetMethodWebRequest(deployUrl + "LoginServlet"); request.setParameter("username", "username"); request.setParameter("password", "password"); WebResponse response = webConversation.getResponse(request); assertTrue(response.getText().contains("principal=" + CustomPrincipal.class.getSimpleName())); assertTrue(response.getText().contains("username=username")); assertTrue(response.getText().contains("description=An user description!")); System.out.println(response.getText()); } private static void processCliFile(File file) { CLI cli = CLI.newInstance(); cli.connect("localhost", 9990, null, null); CommandContext commandContext = cli.getCommandContext(); BufferedReader reader = null; try { reader = new BufferedReader(new FileReader(file)); String line = reader.readLine(); while (commandContext.getExitCode() == 0 && !commandContext.isTerminated() && line != null) { commandContext.handleSafe(line.trim()); line = reader.readLine(); } } catch (Throwable e) { throw new IllegalStateException("Failed to process file '" + file.getAbsolutePath() + "'", e); } finally { StreamUtils.safeClose(reader); } } } |
That’s it! Now your servlet login method will authenticate using your custom login module and methods like getUserPrincipal() from the servlet request or getCallerPrincipal() from the EJBContext will return the CustomPrincipal instance.
Fire up a Wildfly instance and run the test using mvm test or just use your favourite IDE.
A few problems:
- It should be possible to add the security domain using only one single CLI command, but for some reason I was getting an erro. I need to have a better look into this.
- I couldn’t find a way to run code before and after the Arquillian deployment, so the code to add the Security Domain is inside the deployment method. I’ll try to find a way to do it.
If you want additional information, please check the following references:
If you’re too lazy to write the code on your own or just want a working sample, you can download it here. Enjoy!