Are you looking for ways to be more productive? It shouldn’t be a secret that performing actions using the keyboard instead of the mouse will save you time. If you think only about a single action it’s not a big deal. What if you use the same action multiple times a day? If you add up all these actions, they can have a great impact on your productivity.
I’m more or less used to drive most of my actions with keyboard shortcuts. When I was younger, I played semi-professionally Real Time Strategy computer games, including Starcraft and Warcraft III. Starcraft, popularized the term APM (Actions per Minute), which counted the number of actions that a player performed per minute. By using tools, it was possible to record APMs and tell if players were using mouse actions or a keyboard and mouse action combination. Usually, players with a keyboard and mouse combination gameplay had a better chance of winning games than the one that just clicked.
So, what does this have to do with code and IntelliJ? Well, I believe that you can increase your code development productivity by learning and using the keyboard shortcuts to perform the desired actions. You can check the keyboard shortcuts on IntelliJ and you can also check the Productivity Guide which monitors your most used actions. This information is very useful, but it may be a little difficult to change your habits right away. To help you with this, I will describe my most used shortcuts in IntelliJ. You can start familiarize yourself with these and slowly introduce additional shortcuts.
Shortcut
Description
CTRL + W / CMD + W
Syntax Aware Selection
This allows you to select code with context. Awesome when you need to select large blocks or just specific parts of a piece of code. If you have this code:
And place the cursor in the auctionFile and use the shortcut, it will select auctionFile. Press it again and the selection will expand to auctionFile -> createAuctionFile(realm, auctionFile). If you press it again, now the selection will expand to files.getFiles().forEach(auctionFile -> createAuctionFile(realm, auctionFile)). Pressing a final time, you get the full piece of code selected.
If you combine it with SHIFT, you can unselect by context as well.
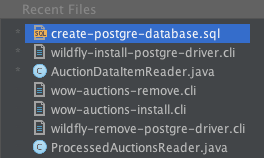
CTRL + E / CMD + E
Recent Viewed Files
This will show you a popup with all the recent files that you have opened in the IDE. If you start typing, you can filter the files.
CTRL + SHIFT + E / CMD + SHIFT + E
Recent Edited Files
Same as Recent Viewed Files, but only shows you the files that you’ve actually changed.
This will try to complete your current statement. How? By adding curly braces, or semicolon and line change. For instance, if you have the following statement:
System.out.print()
Press the shortcut once to add an ending semi-colon. Press it again to add a new line and to position the cursor aligned with the last line.
Another example: if (condition == true)
Press the shortcut to add opening and closing curly braces, and place the cursor inside the if body with additional indentation.
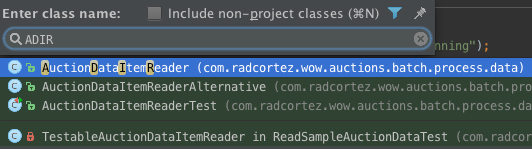
This one allows you to search by name for a Java file in your project. If you combine it with SHIFT, it searches any file. Adding ALT on top of that it searches for symbols. In the search area, you can use CamelHumps (type the capital letters only of the class name) notation to filter files.
I didn’t mention it before, but I guess you are familiar with auto complete via CTRL + SPACE or CMD + SPACE. If you add a SHIFT you get the smart completion. This means that the IDE will try to match expected types that suit the current context and filter all the other options.
CTRL + ALT + ← / CMD + ALT + ←
Navigate Back
This allows you to navigate back like a browser action. It remembers where your cursor was positioned and navigates back even to other files.
Place the cursor in a element and after pressing the cursor the IDE will highlight all the occurrences of the selected element.
There are many more keyboard shortcuts. Almost every action has an equivalent shortcut. It’s hard to learn them all, it takes time and practice. I still learn new things every week, and if for some reason I don’t code as much for a few days, I forget about the new shortcuts I’ve learned. It’s practice, practice, practice! Try to learn a few and master them instead of trying to do everything in one go. It’s easier!
An IntelliJ plugin exists to tell you with shortcuts you should use if you use the mouse. Its Key Promoter, but unfortunately it seems it’s not maintained anymore. Maybe I can update it for the latests IntelliJ versions. I would also like to see in the Productivity Guide a count of actions performed by shortcuts or mouse. If I find some free time, maybe I can do it too.
The batch purpose is to download the World of Warcraft Auction House’s data, process the auctions and extract metrics. These metrics are going to build a history of the Auctions Items price evolution through time. In Part 1, we already downloaded and inserted the data into a database.
The Application
Process Job
After adding the raw data into the database, we are going to add another step with a Chunk style processing. In the chunk we’re are going to read the aggregated data, and then insert it into another table in the database for easy access. This is done in the process-job.xml:
process-job.xml
XHTML
1
2
3
4
5
6
7
<step id="importStatistics">
<chunk item-count="100">
<reader ref="processedAuctionsReader"/>
<processor ref="processedAuctionsProcessor"/>
<writer ref="processedAuctionsWriter"/>
</chunk>
</step>
A Chunk reads the data one item at a time, and creates chunks that will be written out, within a transaction. One item is read in from an ItemReader, handed to an ItemProcessor, and aggregated. Once the number of items read equals the commit interval, the entire chunk is written out via the ItemWriter, and then the transaction is committed.
ProcessedAuctionsReader
In the reader, we are going to select and aggregate metrics using database functions.
For this example, we get the best performance results by using plain JDBC with a simple scrollable result set. In this way, only one query is executed and results are pulled as needed in readItem. You might want to explore other alternatives.
Plain JPA doesn’t have a scrollable result set in the standards, so you need to paginate the results. This will lead to multiple queries which will slow down the reading. Another option is to use the new Java 8 Streams API to perform the aggregation operations. The operations are quick, but you need to select the entire dataset from the database into the streams. Ultimately, this will kill your performance.
I did try both approaches and got the best results by using the database aggregation capabilities. I’m not saying that this is always the best option, but in this particular case it was the best option.
During the implementation, I’ve also found a bug in Batch. You can check it here. An exception is thrown when setting parameters in the PreparedStatement. The workaround was to inject the parameters directly into the query SQL. Ugly, I know…
ProcessedAuctionsProcessor
In the processor, let’s store all the aggregated values in a holder object to store in the database.
Since the metrics record an exact snapshot of the data in time, the calculation only needs to be done once. That’s why we are saving the aggregated metrics. They are never going to change and we can easily check the history.
If you know that your source data is immutable and you need to perform operations on it, I recommend that you persist the result somewhere. This is going to save you time. Of course, you need to balance if this data is going to be accessed many times in the future. If not, maybe you don’t need to go through the trouble of persisting the data.
ProcessedAuctionsWriter
Finally we just need to write the data down to a database:
If you remember a few details of Part 1 post, World of Warcraft servers are called Realms. These realms can be linked with each other and share the same Auction House. To that end, we also have information on how the realms connect with each other. This is important, because we can search for an Auction Item in all the realms that are connected. The rest of the logic is just simple queries to get the data out.
During development, I’ve also found a bug with Eclipse Link (if you run in Glassfish) and Java 8. Apparently the underlying Collection returned by Eclipse Link has the element count set to 0. This doesn’t work well with Streams if you try to inline the query call plus a Stream operation. The Stream will think that it’s empty and no results are returned. You can read a little more about this here.
Interface
I’ve also developed a small interface using Angular and Google Charts to display the metrics. Have a look:
In here, I’m searching in the Realm named “Aggra (Português)” and the Auction Item id 72092 which corresponds to Ghost Iron Ore. As you can see, we can check the quantity for sale, bid and buyout values and price fluctuation through time. Neat? I may write another post about building the Web Interface in the future.
Resources
You can clone a full working copy from my github repository and deploy it to Wildfly or Glassfish. You can find instructions there to deploy it:
When building a system, developers usually disregard the security aspects. Security has been always something very important to worry about, but it’s attracting even higher concerns than before. Just this year we had a few cases like the Heartbleed Bug or the CelebrityGate scandal. This has nothing to do with the post, but are just examples that security really matters and we should be aware of it.
With the increasing popularity of REST services it makes sense that these need to be secured in some way. A couple of weeks ago, I had to integrate my client with a REST service behind https. I have never done it before and that’s the reason for this post. I have to confess that I’m no security expert myself, so please correct me if I write anything stupid.
I’m not going into many details about SSL and TSL, so please check here for additional content. Note that TLS is the new name for SSL evolution. Sometimes there is confusion between the two and people often say SSL, but use the newest version of TSL. Keep that in mind.
Don’t forget to follow the instructions on the following page to setup SSL for Tomcat: SSL Configuration HOW-TO. This is needed for the server to present the client with a set of credentials, a Certificate, to secure the connection between server and client.
Please, note the elements security-constraint, user-data-constraint and <transport-guarantee>CONFIDENTIAL</transport-guarantee>. These are needed to specify that the application requires a secure connection. Check Securing Web Applications for Java Applications.
Running the Service
Just deploy the application on the TomEE Server using your favourite IDE environment and access https://localhost:8443/. You should get the following (you might need to accept the server certificate first):
Note that the browser protocol is https and the port is 8443 (assuming that you kept the default settings in SSL Configuration HOW-TO.
Client
Now, if you try to call this REST service with a Java client, most likely you are going to get the following message and Exception (or similar):
Message:I/O error on GET request for “https://localhost:8443/”:sun.security.validator.ValidatorException:
Exception:Caused by: javax.net.ssl.SSLHandshakeException: sun.security.validator.ValidatorException: PKIX path building failed: sun.security.provider.certpath.SunCertPathBuilderException: unable to find valid certification path to requested target
This happens because the running JDK does not have a valid certificate for your server. You can import it, and get rid of the problem, but let’s do something more interesting. We are going to programatically supply a trusted keystore with our server certificate.
This is especially useful if:
you are running your code into multiple environments
you don’t have to manually import the certificate into the JDK every time
if you upgrade the JDK you have to remember about the certificates
for some odd reason you don’t have access to the JDK itself to import the certificate
Here we use Spring RestOperations interface which specified a basic set of RESTful operations. Next we use Apache HTTP Components SSLConnectionSocketFactory which gives us the ability to validate the identity of the server against a list of trusted certificates. The certificate is loaded from the same file used on the server by KeyStore.
A simple test class. We also need a properties file with the keystore file location and password:
config.properties
config.properties
Java
1
2
keystore.file=${user.home}/.keystore
keystore.pass=changeit
This should work fine if you used all the defaults.
Running the Test
If you now run the test which invokes the REST service within a Java client, you should get the following output:
Response: <200 OK,Called the get Rest Service,{Server=[Apache-Coyote/1.1], Cache-Control=[private], Expires=[Thu, 01 Jan 1970 01:00:00 WET], Content-Type=[text/plain;charset=ISO-8859-1], Content-Length=[27], Date=[Tue, 23 Dec 2014 01:29:20 GMT]}>
Body: Called the get Rest Service
Conclusion
That’s it! You can now call your REST service with your client in a secured manner. If you prefer to add the certificate to the JDK keystore, please check this post.
Stay tuned for an equivalent for Java EE JAX-RS equivalent.
Resources
You can clone a full working copy from my github repository: REST SSL.
Hi everyone! Exactly one year ago, I’ve launched this blog. Looking into my first post, I’ve written the following:
I have created this blog to share any Java related topics to anyone that may care. For me, it would be useful to improve my English and keep a record of stuff I work and do. I usually forget a lot of stuff!
After one year, I think this is still true. I would like to think that my English improved because of the writing. This blog has now been actually one of my most valuable resources. Even yesterday I was looking into one of my older posts because I couldn’t remember a few details about it.
But more important are the Readers! And that is you! The feedback has been overwhelming positive, and I could not Thank You enough for taking your time to read my stuff.
Last Thursday, 11 December 2014, the seventh meeting of Coimbra JUG was held on the Department of Informatics Engineering of the University of Coimbra, in Portugal. This was a special event, since we had the pleasure to have Koen Aers, the first international speaker to visit our JUG, talk a little bit about a very promising tool: JBoss Forge. This meeting was also our First Anniversary Celebration. That’s right, Coimbra JUG was created last year in December. For this meeting we had around 30 people and a few newcomers.
A few people in the audience had already heard about JBoss Forge, but no one was actively using it. Koen demonstrated the tool capabilities by creating a Java EE application, with a few entities and scaffolded a JSF interface in a short amount of time. Next, added some REST services and showed us a way to generate JPA entities with an existing database schema. Time for a break!
Thanks to some of our sponsors we had a few snacks and beer. Of course, we also had a cake to celebrate our first anniversary.
Back to JBoss Forge, Koen was now showing us how to develop plugins. The attendees seemed very curious and interested to learn about it and the questions were great. A lot of interactions and discussions were generated during the session. I might write something about JBoss Forge in the future.