Development tools have been evolving over the last few years. Github revolutionized the way we share and contribute code between projects. Docker made distributions of applications much easier by allowing you to provide an environment for your application to run. Both these technologies simplified the distributions of your applications, but there is still a pain point. Developers that want to tap into your source, edit and build it still have a hard time to set up all the tools. I believe that Codenvy might be the tool to fill this gap.
 What is Codenvy? Codenvy is an IDE in the cloud. You can use it to view, edit, build and deploy code. All of this with just a browser. Codenvy integrates closely with Github and Docker and here is when things become interesting. This allows you to set up an environment that you can share with anyone. Why is this interesting? I already had a few readers asking me for help to set up their environments because they struggle to do it themselves. Several combinations of IDE’s and Operating Systems make the task difficult. Maybe there is another way.
My application about Java EE 7 and Angular is probably the most popular I have. I’ve decided to provide it in Codenvy to hopefully make it easier for all of you that want to try the application out.
Setup
After you signed up for Codenvy, you can easily create a new project by pointing your working sources to a git repository. In this case we are going to use, of course the Java EE 7 with Angular Github repository. You might need to specify to Codenvy that this is a Maven project. If everything was setup properly, you should get something similar to this:

In the IDE window, you can browse the code with syntax highlighting and basic code completion. You can also build the project with maven, if you use the Build menu.
Runners
Checking the code is nice, but we are more interested in actually running the code. Codenvy uses a preset of Docker containers to cover a large number of application servers and environments. There can be found in the Runners tab. Unfortunately, there is no Runner provided for Wildfly and the Glassfish one, doesn’t come with the required database. I’ve ended up by writing my own Docker container to provide a custom made Runner for the Java EE 7 Angular sample application. Here are the Dockerfiles:
Codenvy Wildfly Dockerfile
This Dockerfile is just to set up the environment needed to run the application. Add Java and Wildfly to the base Codenvy container.
1 2 3 4 5 6 7 8 9 10 11 12 13 14 15 16 17 18 19 20 21 22 23 24 25 26 27 28 | FROM codenvy/shellinabox RUN cd ~ && \ sudo mkdir /usr/lib/jvm && \ sudo wget -q -P ~/ --no-check-certificate --header "Cookie: oraclelicense=accept-securebackup-cookie" http://download.oracle.com/otn-pub/java/jdk/8u40-b25/jdk-8u40-linux-x64.tar.gz && \ sudo tar -zxf jdk-8u40-linux-x64.tar.gz -C /usr/lib/jvm && \ sudo update-alternatives --install /usr/bin/java java /usr/lib/jvm/jdk1.8.0_40/bin/java 100 && \ sudo update-alternatives --install /usr/bin/javac javac /usr/lib/jvm/jdk1.8.0_40/bin/javac 100 ENV CODENVY_APP_PORT_8080_HTTP 8080 ENV WILDFLY_VERSION 8.2.0.Final RUN cd ~ && \ sudo wget -q http://download.jboss.org/wildfly/$WILDFLY_VERSION/wildfly-$WILDFLY_VERSION.tar.gz && \ sudo tar -zxf wildfly-$WILDFLY_VERSION.tar.gz && \ sudo mv ~/wildfly-$WILDFLY_VERSION ~/wildfly EXPOSE 8080 RUN cd ~ && \ sudo rm -rf *.tar.gz WORKDIR /home/user CMD sudo sh ~/wildfly/bin/standalone.sh -b 0.0.0.0 && \ sudo touch ~/wildfly/standalone/deployments/ROOT.war.dodeploy && \ tail -f ~/wildfly/standalone/log/server.log |
Codenvy JavaEE 7 Angular Application Dockerfile
This Dockerfile is to map the source code available in Codenvy to a folder in the Docker container. In this way, we can then deploy the code to an application server.
| FROM radcortez/codenvy-wildfly ENV CODENVY_APP_BIND_DIR /home/user/wildfly/standalone/deployments/ROOT.war VOLUME ["/home/user/wildfly/standalone/deployments/ROOT.war"] RUN sudo touch ~/wildfly/standalone/deployments/ROOT.war.dodeploy |
Don’t bother too much about this. Codenvy will import into the project the Dockerfiles that are stored at the project structure in .codenvy/runners/environments/[NAME]. Since I added my runner to the project sources, this will be imported automatically.
Run the Application
To run the application, just press the Play button in the top right corner. You should see the log of the container starting up and also an url at the bottom. This url is the one you need to use to access the application.

And that’s it! You can now play with the application! You even have a Terminal at your disposal.
Sharing the environment
It was easy to set up the environment here, but wouldn’t it be cool if we could just share it with other people? You could do that by using Factories. Just import your Codenvy project into a Factory and you have available an url to share, which will set up everything for you. So, to access the Java EE 7 Angular application, please use:
https://codenvy.com/f?id=ybnr6nsyrimeoyhg
A few problems
Unfortunately, I’ve also encountered a few problems when I was setting up the environment.
- The code does not get updated in the mapped folder of the running container. If you make changes to the code, you need to restart the container. Even if they are just HTML or Javascript changes for instance.
- In Safari the Runner buttons are not visible, but they are clickable.
- In Firefox I couldn’t type a dash or other special characters in the terminal.
- Terminal sometimes is not visible.
The code not updating is a real pain. Other things are minors. I hope that this could be fixed soon.
Conclusion
Codenvy is a very impressive tool, if we take into account that we are talking about a cloud browser base IDE. I don’t think that Codenvy is going to replace conventional IDE’s. Although it’s a great alternative to distribute your applications and give the chance for other developers to try them out with minimal effort. Again, here is the link for the JavaEE 7 with Angular application:
https://codenvy.com/f?id=ybnr6nsyrimeoyhg
Check the related posts:
Java EE 7 with Angular JS – Part 1
Java EE 7 with Angular JS – CRUD, REST, Validations – Part 2
This is the promised follow up to the Java EE 7 with Angular JS – Part 1. It took longer than I expect (to find the time to prepare the code and blog post), but it’s finally here!
The Application
The original application in Part 1 it’s only a simple list with pagination and a REST service that feeds the list data.

In this post we’re going to add CRUD (Create, Read, Update, Delete) capabilities, bind REST services to perform these operations on the server side and validate the data.
The Setup
The Setup is the same from Part 1, but here is the list for reference:
The Code
Backend – Java EE 7
The backend does not required many changes. Since we want the ability to create, read, update and delete, we need to add the appropriate methods in the REST service to perform these operations:
1 2 3 4 5 6 7 8 9 10 11 12 13 14 15 16 17 18 19 20 21 22 23 24 25 26 27 28 29 30 31 32 33 34 35 36 37 38 39 40 41 42 43 44 45 46 47 48 49 50 51 52 53 54 55 56 57 58 59 60 61 62 63 64 65 66 67 68 69 70 71 72 73 74 75 76 77 78 79 80 81 82 83 84 85 86 87 88 89 90 91 92 93 94 95 | package com.cortez.samples.javaee7angular.rest; import com.cortez.samples.javaee7angular.data.Person; import com.cortez.samples.javaee7angular.pagination.PaginatedListWrapper; import javax.ejb.Stateless; import javax.persistence.EntityManager; import javax.persistence.PersistenceContext; import javax.persistence.Query; import javax.ws.rs.*; import javax.ws.rs.core.Application; import javax.ws.rs.core.MediaType; import java.util.List; @Stateless @ApplicationPath("/resources") @Path("persons") @Consumes(MediaType.APPLICATION_JSON) @Produces(MediaType.APPLICATION_JSON) public class PersonResource extends Application { @PersistenceContext private EntityManager entityManager; private Integer countPersons() { Query query = entityManager.createQuery("SELECT COUNT(p.id) FROM Person p"); return ((Long) query.getSingleResult()).intValue(); } @SuppressWarnings("unchecked") private List<Person> findPersons(int startPosition, int maxResults, String sortFields, String sortDirections) { Query query = entityManager.createQuery("SELECT p FROM Person p ORDER BY " + sortFields + " " + sortDirections); query.setFirstResult(startPosition); query.setMaxResults(maxResults); return query.getResultList(); } private PaginatedListWrapper<Person> findPersons(PaginatedListWrapper<Person> wrapper) { wrapper.setTotalResults(countPersons()); int start = (wrapper.getCurrentPage() - 1) * wrapper.getPageSize(); wrapper.setList(findPersons(start, wrapper.getPageSize(), wrapper.getSortFields(), wrapper.getSortDirections())); return wrapper; } @GET public PaginatedListWrapper<Person> listPersons(@DefaultValue("1") @QueryParam("page") Integer page, @DefaultValue("id") @QueryParam("sortFields") String sortFields, @DefaultValue("asc") @QueryParam("sortDirections") String sortDirections) { PaginatedListWrapper<Person> paginatedListWrapper = new PaginatedListWrapper<>(); paginatedListWrapper.setCurrentPage(page); paginatedListWrapper.setSortFields(sortFields); paginatedListWrapper.setSortDirections(sortDirections); paginatedListWrapper.setPageSize(10); return findPersons(paginatedListWrapper); } @GET @Path("{id}") public Person getPerson( @PathParam("id") Long id) { return entityManager.find(Person.class, id); } @POST public Person savePerson(Person person) { if (person.getId() == null) { Person personToSave = new Person(); personToSave.setName(person.getName()); personToSave.setDescription(person.getDescription()); personToSave.setImageUrl(person.getImageUrl()); entityManager.persist(person); } else { Person personToUpdate = getPerson(person.getId()); personToUpdate.setName(person.getName()); personToUpdate.setDescription(person.getDescription()); personToUpdate.setImageUrl(person.getImageUrl()); person = entityManager.merge(personToUpdate); } return person; } @DELETE @Path("{id}") public void deletePerson(@PathParam("id") Long id) { entityManager.remove(getPerson(id)); } } |
The code is exactly as a normal Java POJO, but using the Java EE annotations to enhance the behaviour. @ApplicationPath("/resources") and @Path("persons") will expose the REST service at the url yourdomain/resources/persons (yourdomain will be the host where the application is running). @Consumes(MediaType.APPLICATION_JSON) and @Produces(MediaType.APPLICATION_JSON) accept and format REST request and response as JSON.
For the REST operations:
| Annotation / HTTP Method | Java Method | URL | Behaviour |
|---|
@GET / GET | listPersons | http://yourdomain/resources/persons | Returns a paginated list of 10 persons. |
@GET / GET | getPerson | http://yourdomain/resources/persons/{id} | Returns a Person entity by it’s id. |
@POST / POST | savePerson | http://yourdomain/resources/persons | Creates or Updates a Person. |
@DELETE / DELETE | deletePerson | http://yourdomain/resources/persons/{id} | Deletes a Person entity by it’s id. |
The url invoked for each operations is very similar. The magic to distinguish which operation needs to be called is defined in the HTTP method itself when the request is submitted. Check HTTP Method definitions.
For getPerson and deletePerson note that we added the annotation @Path("{id}") which defines an optional path to call the service. Since we need to know which object we want to get or delete, we need to indicate the id somehow. This is done in the service url to be called, so if we want to delete the Person with id 1, we would call http://yourdomain/resources/persons/1 with the HTTP method DELETE.
That’s it for the backend stuff. Only 30 lines of code added to the old REST service. I have also added a new property to the Person object, to hold a link to image with the purpose of displaying an avatar of the person.
UI – Angular JS
For the UI part, I’ve decided to split it into 3 sections: the grid, the form and the feedback messages sections, each with its own Angular controller. The grid is mostly the same from Part 1, but it did require some tweaks for the new stuff:
Grid HTML
| <!-- Specify a Angular controller script that binds Javascript variables to the grid.--> <div class="grid" ng-controller="personsListController"> <div> <h3>List Persons</h3> </div> <!-- Binds the grid component to be displayed. --> <div class="gridStyle" ng-grid="gridOptions"></div> <!-- Bind the pagination component to be displayed. --> <pagination direction-links="true" boundary-links="true" total-items="persons.totalResults" items-per-page="persons.pageSize" ng-model="persons.currentPage" ng-change="refreshGrid()"> </pagination> </div> |
Nothing special here. Pretty much the same as Part 1.
Grid Angular Controller
1 2 3 4 5 6 7 8 9 10 11 12 13 14 15 16 17 18 19 20 21 22 23 24 25 26 27 28 29 30 31 32 33 34 35 36 37 38 39 40 41 42 43 44 45 46 47 48 49 50 51 52 53 54 55 56 57 58 59 60 61 62 63 64 65 66 67 68 69 | app.controller('personsListController', function ($scope, $rootScope, personService) { // Initialize required information: sorting, the first page to show and the grid options. $scope.sortInfo = {fields: ['id'], directions: ['asc']}; $scope.persons = {currentPage: 1}; $scope.gridOptions = { data: 'persons.list', useExternalSorting: true, sortInfo: $scope.sortInfo, columnDefs: [ { field: 'id', displayName: 'Id' }, { field: 'name', displayName: 'Name' }, { field: 'description', displayName: 'Description' }, { field: '', width: 30, cellTemplate: '<span class="glyphicon glyphicon-remove remove" ng-click="deleteRow(row)"></span>' } ], multiSelect: false, selectedItems: [], // Broadcasts an event when a row is selected, to signal the form that it needs to load the row data. afterSelectionChange: function (rowItem) { if (rowItem.selected) { $rootScope.$broadcast('personSelected', $scope.gridOptions.selectedItems[0].id); } } }; // Refresh the grid, calling the appropriate rest method. $scope.refreshGrid = function () { var listPersonsArgs = { page: $scope.persons.currentPage, sortFields: $scope.sortInfo.fields[0], sortDirections: $scope.sortInfo.directions[0] }; personService.get(listPersonsArgs, function (data) { $scope.persons = data; }) }; // Broadcast an event when an element in the grid is deleted. No real deletion is perfomed at this point. $scope.deleteRow = function (row) { $rootScope.$broadcast('deletePerson', row.entity.id); }; // Watch the sortInfo variable. If changes are detected than we need to refresh the grid. // This also works for the first page access, since we assign the initial sorting in the initialize section. $scope.$watch('sortInfo.fields[0]', function () { $scope.refreshGrid(); }, true); // Do something when the grid is sorted. // The grid throws the ngGridEventSorted that gets picked up here and assigns the sortInfo to the scope. // This will allow to watch the sortInfo in the scope for changed and refresh the grid. $scope.$on('ngGridEventSorted', function (event, sortInfo) { $scope.sortInfo = sortInfo; }); // Picks the event broadcasted when a person is saved or deleted to refresh the grid elements with the most // updated information. $scope.$on('refreshGrid', function () { $scope.refreshGrid(); }); // Picks the event broadcasted when the form is cleared to also clear the grid selection. $scope.$on('clear', function () { $scope.gridOptions.selectAll(false); }); }); |
A few more attributes are required to configure the behaviour of the grid. The important bits are the data: 'persons.list' which binds the grid data to Angular model value $scope.persons, the columnDefs which allow us to model the grid as we see fit. Since I wanted to add an option to delete each row, I needed to add a new cell which call the function deleteRow when you click in cross icon. The afterSelectionChanges function is required to update the form data with the person selected in the grid. You can check other grid options here.
The rest of the code is self-explanatory and there is also a few comments in there. A special note about $rootScope.$broadcast: this is used to dispatch an event to all the other controllers. This is a way to communicate between controllers, since the grid, form and feedback messages have separate controllers. If everything was in only one controller, this was not required and a simple function call would be enough. Another possible solution if we want to keep the multiple controllers, would be to use Angular services. The used approach seems much cleaner since it separates the application concerns and does not require you to implement additional Angular services, but it might be a little harder to debug if needed.
Form HTML
1 2 3 4 5 6 7 8 9 10 11 12 13 14 15 16 17 18 19 20 21 22 23 24 25 26 27 28 29 30 31 32 33 34 35 36 37 38 39 40 41 42 43 44 45 46 47 48 49 50 51 52 53 54 55 56 57 58 59 60 61 62 63 64 65 66 67 68 69 70 71 72 73 | <div class="form" ng-controller="personsFormController"> <!-- Verify person, if there is no id present, that we are Adding a Person --> <div ng-if="person.id == null"> <h3>Add Person</h3> </div> <!-- Otherwise it's an Edit --> <div ng-if="person.id != null"> <h3>Edit Person</h3> </div> <div> <!-- Specify the function to be called on submit and disable HTML5 validation, since we're using Angular validation--> <form name="personForm" ng-submit="updatePerson()" novalidate> <!-- Display an error if the input is invalid and is dirty (only when someone changes the value) --> <div class="form-group" ng-class="{'has-error' : personForm.name.$invalid && personForm.name.$dirty}"> <label for="name">Name:</label> <!-- Display a check when the field is valid and was modified --> <span ng-class="{'glyphicon glyphicon-ok' : personForm.name.$valid && personForm.name.$dirty}"></span> <input id="name" name="name" type="text" class="form-control" maxlength="50" ng-model="person.name" required ng-minlength="2" ng-maxlength="50"/> <!-- Validation messages to be displayed on required, minlength and maxlength --> <p class="help-block" ng-show="personForm.name.$error.required">Add Name.</p> <p class="help-block" ng-show="personForm.name.$error.minlength">Name must be at least 2 characters long.</p> <p class="help-block" ng-show="personForm.name.$error.maxlength">Name cannot be longer than 50 characters.</p> </div> <!-- Display an error if the input is invalid and is dirty (only when someone changes the value) --> <div class="form-group" ng-class="{'has-error' : personForm.description.$invalid && personForm.description.$dirty}"> <label for="description">Description:</label> <!-- Display a check when the field is valid and was modified --> <span ng-class="{'glyphicon glyphicon-ok' : personForm.description.$valid && personForm.description.$dirty}"></span> <input id="description" name="description" type="text" class="form-control" maxlength="100" ng-model="person.description" required ng-minlength="5" ng-maxlength="100"/> <!-- Validation messages to be displayed on required, minlength and maxlength --> <p class="help-block" ng-show="personForm.description.$error.required">Add Description.</p> <p class="help-block" ng-show="personForm.description.$error.minlength">Description must be at least 5 characters long.</p> <p class="help-block" ng-show="personForm.description.$error.maxlength">Description cannot be longer than 100 characters.</p> </div> <!-- Display an error if the input is invalid and is dirty (only when someone changes the value) --> <div class="form-group" ng-class="{'has-error' : personForm.imageUrl.$invalid && personForm.imageUrl.$dirty}"> <label for="imageUrl">Image URL:</label> <!-- Display a check when the field is valid and was modified --> <span ng-class="{'glyphicon glyphicon-ok' : personForm.imageUrl.$valid && personForm.imageUrl.$dirty}"></span> <input id="imageUrl" name="imageUrl" type="url" class="form-control" maxlength="500" ng-model="person.imageUrl" required/> <!-- Validation messages to be displayed on required and invalid. Type 'url' makes checks to a proper url format. --> <p class="help-block" ng-show="personForm.imageUrl.$error.required">Add Image URL.</p> <p class="help-block" ng-show="personForm.imageUrl.$invalid && personForm.imageUrl.$dirty">Invalid Image URL.</p> </div> <div class="avatar" ng-if="person.imageUrl"> <img ng-src="{{person.imageUrl}}" width="400" height="250"/> </div> <!-- Form buttons. The 'Save' button is only enabled when the form is valid. --> <div class="buttons"> <button type="button" class="btn btn-primary" ng-click="clearForm()">Clear</button> <button type="submit" class="btn btn-primary" ng-disabled="personForm.$invalid">Save</button> </div> </form> </div> </div> |
Here is the looks:
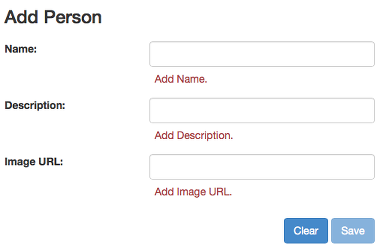
A lot of codeis for validation purposes, but lets look into this a bit more in detail: each input element binds its value to person.something. This allows to model the data between the HTML and the Javascript controller, so we can write $scope.person.name in our controller to get the value filled in the form input with name, name. To access the data inside the HTML form we use the form name personForm plus the name of the input field.
HTML5 have its own set of validations in the input fields, but we want to use the Angular ones. In that case, we need to disable form validations by using novalidate at the form element. Now, to use Angular validations, we can use a few Angular directives in the input elements. For this very basic form, we only use required, ng-minlength and ng-maxlength, but you can use others. Just look into the documentation.
Angular assigns CSS classes based on the input validation state. To have an idea, these are the possible values:
| State | CSS | On |
|---|
valid | ng-valid | When the field is valid. |
invalid | ng-invalid | When the field is invalid. |
pristine | ng-pristine | When the field was never touched before. |
dirty | ng-dirty | When the field is changed. |
These CSS classes are empty. You need to create them and assign them styles in an included CSS sheet for the application. Instead, we’re going to use styles from Bootstrap which are very nice. For them to work, a few additional classes need to be applied to the elements. The div element enclosing the input needs the CSS class form-group and the input element needs the CSS class form-control.
To display an invalid input field we add ng-class="{'has-error' : personForm.name.$invalid && personForm.name.$dirty}" to the containing input div. This code evaluates if the name in the personForm is invalid and if it’s dirty. It the condition verifies, then the input is displayed as invalid.
Finally, for the form validation messages we need to verify the $error directive for each of the inputs and types of validations being performed. Just add ng-show="personForm.name.$error.minlength" to an HTML display element with a message to warn the user that the name input field is too short.
Form Angular Controller
1 2 3 4 5 6 7 8 9 10 11 12 13 14 15 16 17 18 19 20 21 22 23 24 25 26 27 28 29 30 31 32 33 34 35 36 37 38 39 40 41 42 43 44 45 46 47 48 49 50 51 52 53 | // Create a controller with name personsFormController to bind to the form section. app.controller('personsFormController', function ($scope, $rootScope, personService) { // Clears the form. Either by clicking the 'Clear' button in the form, or when a successfull save is performed. $scope.clearForm = function () { $scope.person = null; // For some reason, I was unable to clear field values with type 'url' if the value is invalid. // This is a workaroud. Needs proper investigation. document.getElementById('imageUrl').value = null; // Resets the form validation state. $scope.personForm.$setPristine(); // Broadcast the event to also clear the grid selection. $rootScope.$broadcast('clear'); }; // Calls the rest method to save a person. $scope.updatePerson = function () { personService.save($scope.person).$promise.then( function () { // Broadcast the event to refresh the grid. $rootScope.$broadcast('refreshGrid'); // Broadcast the event to display a save message. $rootScope.$broadcast('personSaved'); $scope.clearForm(); }, function () { // Broadcast the event for a server error. $rootScope.$broadcast('error'); }); }; // Picks up the event broadcasted when the person is selected from the grid and perform the person load by calling // the appropiate rest service. $scope.$on('personSelected', function (event, id) { $scope.person = personService.get({id: id}); }); // Picks us the event broadcasted when the person is deleted from the grid and perform the actual person delete by // calling the appropiate rest service. $scope.$on('deletePerson', function (event, id) { personService.delete({id: id}).$promise.then( function () { // Broadcast the event to refresh the grid. $rootScope.$broadcast('refreshGrid'); // Broadcast the event to display a delete message. $rootScope.$broadcast('personDeleted'); $scope.clearForm(); }, function () { // Broadcast the event for a server error. $rootScope.$broadcast('error'); }); }); }); |
For the form controller, we need the two functions that perform the operations associated with the button Clear and the button Save which are self-explanatory. A quick note: for some reason, Angular does not clear input fields which are in invalid state. I did found a few people complaining about the same problem, but I need to investigate this further. Maybe it’s something I’m doing wrong.
REST services are called using save and delete from the $resource object which already implement the correspondent HTTP methods. Check the documentation. You can get a $resource with the following factory:
| // Service that provides persons operations app.factory('personService', function ($resource) { return $resource('resources/persons/:id'); }); |
The rest of the controller code, are functions to pickup the events created by the grid to load the person data in the form and delete the person. This controller also create a few events. If we add or remove persons, the grid needs to be updated so an event is generated requesting the grid to be updated.
Feedback Messages HTML
| <!-- Specify a Angular controller script that binds Javascript variables to the feedback messages.--> <div class="message" ng-controller="alertMessagesController"> <alert ng-repeat="alert in alerts" type="{{alert.type}}" close="closeAlert($index)">{{alert.msg}}</alert> </div> |
This is just the top section of the application, to display success or error messages based on save, delete or server error.
Feedback Messages Angular Controller
1 2 3 4 5 6 7 8 9 10 11 12 13 14 15 16 17 18 19 20 21 22 23 24 25 26 27 | // Create a controller with name alertMessagesController to bind to the feedback messages section. app.controller('alertMessagesController', function ($scope) { // Picks up the event to display a saved message. $scope.$on('personSaved', function () { $scope.alerts = [ { type: 'success', msg: 'Record saved successfully!' } ]; }); // Picks up the event to display a deleted message. $scope.$on('personDeleted', function () { $scope.alerts = [ { type: 'success', msg: 'Record deleted successfully!' } ]; }); // Picks up the event to display a server error message. $scope.$on('error', function () { $scope.alerts = [ { type: 'danger', msg: 'There was a problem in the server!' } ]; }); $scope.closeAlert = function (index) { $scope.alerts.splice(index, 1); }; }); |
This is the controller that push the messages to the view. Listens to the events created by the grid and the form controllers.
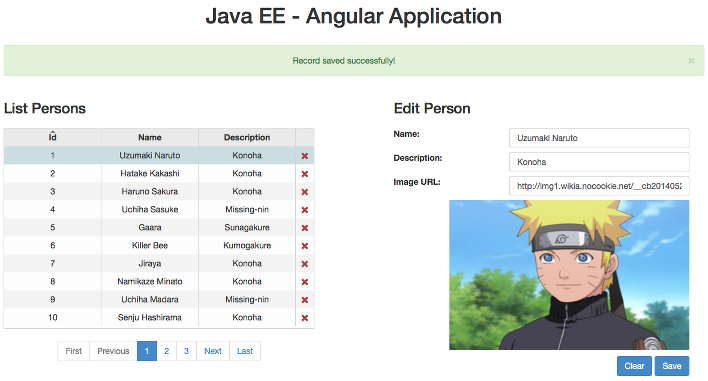
The End Result
Uff.. that was a lot of code and new information. Let’s see the final result:
There is also a live version running in http://javaee7-angular.radcortez.cloudbees.net, thanks to Cloudbees. It may take a while to open if the cloud instances is hibernated (because of no usage).
Unfortunately, Cloudbees stopped application hosting, but you can try using Codenvy in the following URL: https://codenvy.com/f?id=3qe4qr7mb8i86lpe. Check the post: Codenvy setup to demo applications using Docker: Java EE 7 with Angular.
Resources
You can clone a full working copy from my github repository and deploy it to Wildfly. You can find instructions there to deploy it. Should also work on Glassfish.
Java EE – Angular JS Source
Since I may modify the code in the future, you can download the original source of this post from the release 3.0. In alternative, clone the repo and checkout the tag from release 3.0 with the following command: git checkout 3.0.
Check also:
Final Thoughts
- The form validation kicks in right after you start typing. Angular 1.3 will have an on blur property to validate only after loosing focus, but I’m still using Angular 1.2.x.
- I have to confess that I found the validation code a bit too verbose. I don’t know if there is a way to simplify it, but you shouldn’t need to add each message validation to each input.
- A few things are still lacking here, like parameters sanitisation or server side validation. I’ll cover those in a next blog post.
This was a very long post, actually the longest I’ve wrote on my blog. If you reached this far, thank you so much for your time reading this post. I hope you enjoyed it! Let me know if you have any comments.
Today’s post will show you how to build a very simple application using Java EE 7 and Angular JS. Before going there let me tell you a brief story:
I have to confess that I was never a big fan of Javascript, but I still remember the first time I have used it. I don’t remember the year exactly, but probably around mid 90’s. I had a page with 3 frames (yes frames! remember those? very popular around that time) and I wanted to reload 2 frames when I clicked a link on the 3rd frame. At the time, Javascript was used to do some fancy stuff on webpages, not every browser have Javascript support and some even required you to turn it on. Fast forwarding to today the landscaped changed dramatically. Javascript is a full development stack now and you can develop entire applications written only in Javascript. Unfortunately for me, sometimes I still think I’m back in the 90’s and don’t give enough credit to Javascript, so this is my attempt to get to know Javascript better.
Why Java EE 7?
Well, I like Java and the new Java EE version is pretty good. Less verbose and very fast using Wildfly or Glassfish. It provides you with a large set of specifications to suit your needs and it’s a standard in the Java world.
Why Angular JS?
I’m probably following the big hype around Angular here. Since I don’t have much experience with Javascript I don’t know the offers very well, so I’m just following advice of some friends and I have also noticed a big acceptance of Angular in the last Devoxx. Every room with an Angular talk was full, so I wanted to give it a try and found out for myself.
The Application
For the application, it’s a simple list with pagination and a REST service that feeds the list data. Every time I start a new enterprise project it’s usually the first thing we code: create a table, store some data and list some random data, so I think it’s appropriate.
The Setup
The Code (finally!)
Backend – Java EE 7
Starting with the backend, let’s define a very simple Entity class (some code is omitted for simplicity):
| @Entity public class Person { @Id private Long id; private String name; private String description; } |
If you’re not familiar with Java EE JPA specification, this will allow to model an object class into a database table by using the annotation @Entity to connect to the database table with the same name and the annotation @Id to identify the table primary key.
Following by a persistence.xml:
| <?xml version="1.0" encoding="UTF-8"?> <persistence version="2.1" xmlns="http://xmlns.jcp.org/xml/ns/persistence" xmlns:xsi="http://www.w3.org/2001/XMLSchema-instance" xsi:schemaLocation="http://xmlns.jcp.org/xml/ns/persistence http://xmlns.jcp.org/xml/ns/persistence/persistence_2_1.xsd"> <persistence-unit name="myPU" transaction-type="JTA"> <properties> <property name="javax.persistence.schema-generation.database.action" value="drop-and-create"/> <property name="javax.persistence.schema-generation.create-source" value="script"/> <property name="javax.persistence.schema-generation.drop-source" value="script"/> <property name="javax.persistence.schema-generation.create-script-source" value="sql/create.sql"/> <property name="javax.persistence.schema-generation.drop-script-source" value="sql/drop.sql"/> <property name="javax.persistence.sql-load-script-source" value="sql/load.sql"/> </properties> </persistence-unit> </persistence> |
Two of my favourite new features on Java EE 7: now you can run sql in a standard way by using the properties javax.persistence.schema-generation.* and it also binds you to a default datasource if you don’t provide one. So for this case, it’s going to use the internal Wildfly H2 database for our application.
Finally, to provide the list data we need to query the database and expose it as a REST service:
1 2 3 4 5 6 7 8 9 10 11 12 13 14 15 16 17 18 19 20 21 22 23 24 25 26 27 28 29 30 31 32 33 34 35 36 37 38 39 40 41 42 43 44 45 46 47 48 49 | @Stateless @ApplicationPath("/resources") @Path("persons") public class PersonResource extends Application { @PersistenceContext private EntityManager entityManager; private Integer countPersons() { Query query = entityManager.createQuery("SELECT COUNT(p.id) FROM Person p"); return ((Long) query.getSingleResult()).intValue(); } @SuppressWarnings("unchecked") private List<Person> findPersons(int startPosition, int maxResults, String sortFields, String sortDirections) { Query query = entityManager.createQuery("SELECT p FROM Person p ORDER BY " + sortFields + " " + sortDirections); query.setFirstResult(startPosition); query.setMaxResults(maxResults); return query.getResultList(); } public PaginatedListWrapper<Person> findPersons(PaginatedListWrapper<Person> wrapper) { wrapper.setTotalResults(countPersons()); int start = (wrapper.getCurrentPage() - 1) * wrapper.getPageSize(); wrapper.setList(findPersons(start, wrapper.getPageSize(), wrapper.getSortFields(), wrapper.getSortDirections())); return wrapper; } @GET @Produces(MediaType.APPLICATION_JSON) public PaginatedListWrapper<Person> listPersons(@DefaultValue("1") @QueryParam("page") Integer page, @DefaultValue("id") @QueryParam("sortFields") String sortFields, @DefaultValue("asc") @QueryParam("sortDirections") String sortDirections) { PaginatedListWrapper<Person> paginatedListWrapper = new PaginatedListWrapper<>(); paginatedListWrapper.setCurrentPage(page); paginatedListWrapper.setSortFields(sortFields); paginatedListWrapper.setSortDirections(sortDirections); paginatedListWrapper.setPageSize(5); return findPersons(paginatedListWrapper); } } |
The code is exactly as a normal Java POJO, but using the Java EE annotations to enhance the behaviour. @ApplicationPath("/resources") and @Path("persons") will expose the REST service at the url yourdomain/resources/persons, @GET marks the logic to be called by the http GET method and @Produces(MediaType.APPLICATION_JSON) formats the REST response as JSON format. Pretty cool with only a few annotations.
To make it a little easier to exchange the needed information for the paginated list, I have also created the following wrapper class:
| public class PaginatedListWrapper<T> { private Integer currentPage; private Integer pageSize; private Integer totalResults; private String sortFields; private String sortDirections; private List<T> list; } |
And we are done with the backend stuff.
UI – Angular JS
To display the data we are going to use Angular JS. Angular extends the traditional HTML with additional custom tag attributes to bind data represented in Javascript variables by following a MVC approach. So, lets look to our html page:
1 2 3 4 5 6 7 8 9 10 11 12 13 14 15 16 17 18 19 20 21 22 23 24 25 26 27 28 29 30 31 32 33 34 35 36 37 | <!DOCTYPE html> <!-- Declares the root element that allows behaviour to be modified through Angular custom HTML tags. --> <html ng-app="persons"> <head> <title></title> <script src="lib/angular.min.js"></script> <script src="lib/jquery-1.9.1.js"></script> <script src="lib/ui-bootstrap-0.10.0.min.js"></script> <script src="lib/ng-grid.min.js"></script> <script src="script/person.js"></script> <link rel="stylesheet" type="text/css" href="lib/bootstrap.min.css"/> <link rel="stylesheet" type="text/css" href="lib/ng-grid.min.css"/> <link rel="stylesheet" type="text/css" href="css/style.css"/> </head> <body> <br> <div class="grid"> <!-- Specify a JavaScript controller script that binds Javascript variables to the HTML.--> <div ng-controller="personsList"> <!-- Binds the grid component to be displayed. --> <div class="gridStyle" ng-grid="gridOptions"></div> <!-- Bind the pagination component to be displayed. --> <pagination direction-links="true" boundary-links="true" total-items="persons.totalResults" page="persons.currentPage" items-per-page="persons.pageSize" on-select-page="refreshGrid(page)"> </pagination> </div> </div> </body> </html> |
Apart from the Javascript and CSS declarations there is very little code in there. Very impressive. Angular also have a wide range of ready to use components, so I’m using the ng-grid to display the data and UI Bootstrap that provides a pagination component. The ng-grid also have a pagination component, but I liked the UI Bootstrap pagination component more.
There is something still missing. The Javascript file where everything happens:
1 2 3 4 5 6 7 8 9 10 11 12 13 14 15 16 17 18 19 20 21 22 23 24 25 26 27 28 29 30 31 32 33 34 35 36 37 38 39 40 | var app = angular.module('persons', ['ngGrid', 'ui.bootstrap']); // Create a controller with name personsList to bind to the html page. app.controller('personsList', function ($scope, $http) { // Makes the REST request to get the data to populate the grid. $scope.refreshGrid = function (page) { $http({ url: 'resources/persons', method: 'GET', params: { page: page, sortFields: $scope.sortInfo.fields[0], sortDirections: $scope.sortInfo.directions[0] } }).success(function (data) { $scope.persons = data; }); }; // Do something when the grid is sorted. // The grid throws the ngGridEventSorted that gets picked up here and assigns the sortInfo to the scope. // This will allow to watch the sortInfo in the scope for changed and refresh the grid. $scope.$on('ngGridEventSorted', function (event, sortInfo) { $scope.sortInfo = sortInfo; }); // Watch the sortInfo variable. If changes are detected than we need to refresh the grid. // This also works for the first page access, since we assign the initial sorting in the initialize section. $scope.$watch('sortInfo', function () { $scope.refreshGrid($scope.persons.currentPage); }, true); // Initialize required information: sorting, the first page to show and the grid options. $scope.sortInfo = {fields: ['id'], directions: ['asc']}; $scope.persons = {currentPage : 1}; $scope.gridOptions = { data: 'persons.list', useExternalSorting: true, sortInfo: $scope.sortInfo }; }); |
The Javascript code is very clean and organised. Notice how everything gets added to an app controller, allowing you to have multiple separation of concerns on your business logic. To implement the required behaviour we just need to add a few functions to refresh the list by calling our REST service and monitor the grid data to refresh the view. This is the end result:
Next Steps:
For the following posts related with these series, I’m planning to:
Resources
You can clone a full working copy from my github repository and deploy it to Wildfly. You can find instructions there to deploy it. Should also work on Glassfish.
Java EE – Angular JS Source
Update
In the meanwhile I have updated the original code with the post about Manage Javascript dependencies. Please, download the original source of this post from the release 1.0. You can also clone the repo, and checkout the tag from release 1.0 with the following command: git checkout 1.0.
I hope you enjoyed the post! Let me know if you have any comments about this.