Last week, JavaOne 2014 published the sessions schedules plus the Schedule Builder for attendees to enrol in the sessions. I’m going to be speaking in the following sessions:
If you’re going, please sign-up for these sessions. I’m going to do my best to make sure that your time is well spent there. Check my previous post with some additional information about the sessions: Speaking at JavaOne 2014.
This is the promised follow up to the Java EE 7 with Angular JS – Part 1. It took longer than I expect (to find the time to prepare the code and blog post), but it’s finally here!
The Application
The original application in Part 1 it’s only a simple list with pagination and a REST service that feeds the list data.
In this post we’re going to add CRUD (Create, Read, Update, Delete) capabilities, bind REST services to perform these operations on the server side and validate the data.
The Setup
The Setup is the same from Part 1, but here is the list for reference:
The backend does not required many changes. Since we want the ability to create, read, update and delete, we need to add the appropriate methods in the REST service to perform these operations:
The code is exactly as a normal Java POJO, but using the Java EE annotations to enhance the behaviour. @ApplicationPath("/resources") and @Path("persons") will expose the REST service at the url yourdomain/resources/persons (yourdomain will be the host where the application is running). @Consumes(MediaType.APPLICATION_JSON) and @Produces(MediaType.APPLICATION_JSON) accept and format REST request and response as JSON.
For the REST operations:
Annotation / HTTP Method
Java Method
URL
Behaviour
@GET / GET
listPersons
http://yourdomain/resources/persons
Returns a paginated list of 10 persons.
@GET / GET
getPerson
http://yourdomain/resources/persons/{id}
Returns a Person entity by it’s id.
@POST / POST
savePerson
http://yourdomain/resources/persons
Creates or Updates a Person.
@DELETE / DELETE
deletePerson
http://yourdomain/resources/persons/{id}
Deletes a Person entity by it’s id.
The url invoked for each operations is very similar. The magic to distinguish which operation needs to be called is defined in the HTTP method itself when the request is submitted. Check HTTP Method definitions.
For getPerson and deletePerson note that we added the annotation @Path("{id}") which defines an optional path to call the service. Since we need to know which object we want to get or delete, we need to indicate the id somehow. This is done in the service url to be called, so if we want to delete the Person with id 1, we would call http://yourdomain/resources/persons/1 with the HTTP method DELETE.
That’s it for the backend stuff. Only 30 lines of code added to the old REST service. I have also added a new property to the Person object, to hold a link to image with the purpose of displaying an avatar of the person.
UI – Angular JS
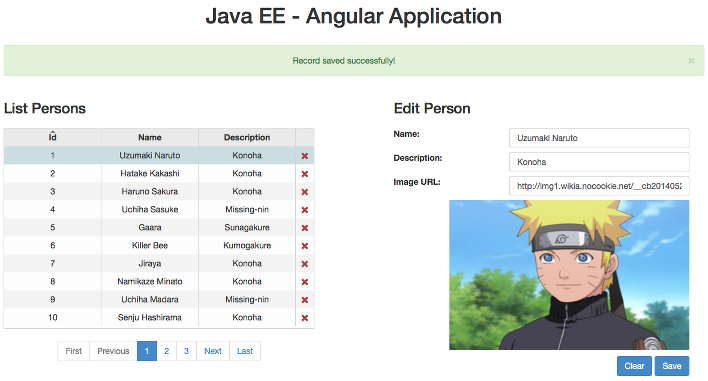
For the UI part, I’ve decided to split it into 3 sections: the grid, the form and the feedback messages sections, each with its own Angular controller. The grid is mostly the same from Part 1, but it did require some tweaks for the new stuff:
Grid HTML
Grid HTML
XHTML
1
2
3
4
5
6
7
8
9
10
11
12
13
14
15
<!-- Specify a Angular controller script that binds Javascript variables to the grid.-->
// Picks the event broadcasted when a person is saved or deleted to refresh the grid elements with the most
// updated information.
$scope.$on('refreshGrid',function(){
$scope.refreshGrid();
});
// Picks the event broadcasted when the form is cleared to also clear the grid selection.
$scope.$on('clear',function(){
$scope.gridOptions.selectAll(false);
});
});
A few more attributes are required to configure the behaviour of the grid. The important bits are the data: 'persons.list' which binds the grid data to Angular model value $scope.persons, the columnDefs which allow us to model the grid as we see fit. Since I wanted to add an option to delete each row, I needed to add a new cell which call the function deleteRow when you click in cross icon. The afterSelectionChanges function is required to update the form data with the person selected in the grid. You can check other grid options here.
The rest of the code is self-explanatory and there is also a few comments in there. A special note about $rootScope.$broadcast: this is used to dispatch an event to all the other controllers. This is a way to communicate between controllers, since the grid, form and feedback messages have separate controllers. If everything was in only one controller, this was not required and a simple function call would be enough. Another possible solution if we want to keep the multiple controllers, would be to use Angular services. The used approach seems much cleaner since it separates the application concerns and does not require you to implement additional Angular services, but it might be a little harder to debug if needed.
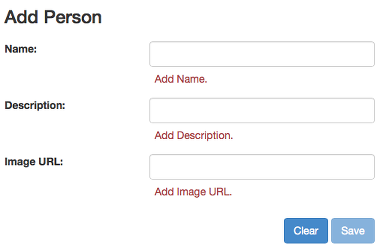
A lot of codeis for validation purposes, but lets look into this a bit more in detail: each input element binds its value to person.something. This allows to model the data between the HTML and the Javascript controller, so we can write $scope.person.name in our controller to get the value filled in the form input with name, name. To access the data inside the HTML form we use the form name personForm plus the name of the input field.
HTML5 have its own set of validations in the input fields, but we want to use the Angular ones. In that case, we need to disable form validations by using novalidate at the form element. Now, to use Angular validations, we can use a few Angular directives in the input elements. For this very basic form, we only use required, ng-minlength and ng-maxlength, but you can use others. Just look into the documentation.
Angular assigns CSS classes based on the input validation state. To have an idea, these are the possible values:
State
CSS
On
valid
ng-valid
When the field is valid.
invalid
ng-invalid
When the field is invalid.
pristine
ng-pristine
When the field was never touched before.
dirty
ng-dirty
When the field is changed.
These CSS classes are empty. You need to create them and assign them styles in an included CSS sheet for the application. Instead, we’re going to use styles from Bootstrap which are very nice. For them to work, a few additional classes need to be applied to the elements. The div element enclosing the input needs the CSS class form-group and the input element needs the CSS class form-control.
To display an invalid input field we add ng-class="{'has-error' : personForm.name.$invalid && personForm.name.$dirty}" to the containing input div. This code evaluates if the name in the personForm is invalid and if it’s dirty. It the condition verifies, then the input is displayed as invalid.
Finally, for the form validation messages we need to verify the $error directive for each of the inputs and types of validations being performed. Just add ng-show="personForm.name.$error.minlength" to an HTML display element with a message to warn the user that the name input field is too short.
Form Angular Controller
Form Angular Controller
JavaScript
1
2
3
4
5
6
7
8
9
10
11
12
13
14
15
16
17
18
19
20
21
22
23
24
25
26
27
28
29
30
31
32
33
34
35
36
37
38
39
40
41
42
43
44
45
46
47
48
49
50
51
52
53
// Create a controller with name personsFormController to bind to the form section.
// Clears the form. Either by clicking the 'Clear' button in the form, or when a successfull save is performed.
$scope.clearForm=function(){
$scope.person=null;
// For some reason, I was unable to clear field values with type 'url' if the value is invalid.
// This is a workaroud. Needs proper investigation.
document.getElementById('imageUrl').value=null;
// Resets the form validation state.
$scope.personForm.$setPristine();
// Broadcast the event to also clear the grid selection.
$rootScope.$broadcast('clear');
};
// Calls the rest method to save a person.
$scope.updatePerson=function(){
personService.save($scope.person).$promise.then(
function(){
// Broadcast the event to refresh the grid.
$rootScope.$broadcast('refreshGrid');
// Broadcast the event to display a save message.
$rootScope.$broadcast('personSaved');
$scope.clearForm();
},
function(){
// Broadcast the event for a server error.
$rootScope.$broadcast('error');
});
};
// Picks up the event broadcasted when the person is selected from the grid and perform the person load by calling
// the appropiate rest service.
$scope.$on('personSelected',function(event,id){
$scope.person=personService.get({id:id});
});
// Picks us the event broadcasted when the person is deleted from the grid and perform the actual person delete by
// calling the appropiate rest service.
$scope.$on('deletePerson',function(event,id){
personService.delete({id:id}).$promise.then(
function(){
// Broadcast the event to refresh the grid.
$rootScope.$broadcast('refreshGrid');
// Broadcast the event to display a delete message.
$rootScope.$broadcast('personDeleted');
$scope.clearForm();
},
function(){
// Broadcast the event for a server error.
$rootScope.$broadcast('error');
});
});
});
For the form controller, we need the two functions that perform the operations associated with the button Clear and the button Save which are self-explanatory. A quick note: for some reason, Angular does not clear input fields which are in invalid state. I did found a few people complaining about the same problem, but I need to investigate this further. Maybe it’s something I’m doing wrong.
REST services are called using save and delete from the $resource object which already implement the correspondent HTTP methods. Check the documentation. You can get a $resource with the following factory:
REST Service
JavaScript
1
2
3
4
// Service that provides persons operations
app.factory('personService',function($resource){
return$resource('resources/persons/:id');
});
The rest of the controller code, are functions to pickup the events created by the grid to load the person data in the form and delete the person. This controller also create a few events. If we add or remove persons, the grid needs to be updated so an event is generated requesting the grid to be updated.
Feedback Messages HTML
Feedback Messages HTML
XHTML
1
2
3
4
<!-- Specify a Angular controller script that binds Javascript variables to the feedback messages.-->
You can clone a full working copy from my github repository and deploy it to Wildfly. You can find instructions there to deploy it. Should also work on Glassfish.
Since I may modify the code in the future, you can download the original source of this post from the release 3.0. In alternative, clone the repo and checkout the tag from release 3.0 with the following command: git checkout 3.0.
The form validation kicks in right after you start typing. Angular 1.3 will have an on blur property to validate only after loosing focus, but I’m still using Angular 1.2.x.
I have to confess that I found the validation code a bit too verbose. I don’t know if there is a way to simplify it, but you shouldn’t need to add each message validation to each input.
A few things are still lacking here, like parameters sanitisation or server side validation. I’ll cover those in a next blog post.
This was a very long post, actually the longest I’ve wrote on my blog. If you reached this far, thank you so much for your time reading this post. I hope you enjoyed it! Let me know if you have any comments.
Yesteday I got really great news. I was selected to present 3 out of 4 sessions that I have submitted to JavaOne 2014! After attending the first JavaOne in 2012, and going again in 2013, this was my first time submitting something for JavaOne.
I have to confess that I had high hopes of being selected, but I was not expecting to have 3 sessions right in the first year of submissions, since there are a lot of submissions and it’s really hard to get selected. A special thanks to Reza Rahman for helping me out during the submission process and for providing valuable tips. Thanks Reza! I would also like to thank you Ivan Ivanov and Simon Maple my co-speakers in two of the sessions.
Have a look below into the sessions abstracts and videos. I don’t have the schedules yet, but look for them in the JavaOne Schedule Builder (when available) and signup 🙂
What am I going to speak about?
CON2818 – Java EE 7 Batch Processing in the Real World
Abstract
This talk will explore one of the newest API for Java EE 7, the JSR 352, Batch Applications for the Java Platform. Batch processing is found in nearly every industry when you need to execute a non-interactive, bulk-oriented and long running operation task. A few examples are: financial transactions, billing, inventory management, report generation and so on. The JSR 352 specifies a common set of requirements that every batch application usually needs like: checkpointing, parallelization, splitting and logging. It also provides you with a job specification language and several interfaces that allow you to implement your business logic and interact with the batch container. We are going to live code a real life example batch application, starting with a simple task and then evolve it using the advanced API’s until we have a full parallel and checkpointing reader-processor-writer batch. By the end of the session, attendees should be able to understand the use cases of the JSR 352, when to apply it and how to develop a full Java EE Batch Application.
Abstract
We all enjoy to hear a good success story, but in the software development industry the life of a developer is also made up of disasters, disappointments and frustrations. Have you ever deleted all the data in production? Or maybe you just run out of disk space and your software failed miserably! How about crashing your server with a bug that you introduced in the latest release? We can learn with each others with the mistakes we made. Come to this BOF and share with us your most horrific development story and what did you do to fix it.
CON4255 – The 5 people in your organization that grow legacy code
Abstract
Have you ever looked at a random piece of code and wanted to rewrite it so badly? It’s natural to have legacy code in your application at some point. It’s something that you need to accept and learn to live with. So is this a lost cause? Should we just throw in the towel and give up? Hell no! Over the years, I learned to identify 5 main creators/enablers of legacy code on the engineering side, which I’m sharing here with you using real development stories (with a little humour in the mix). Learn to keep them in line and your code will live longer!
I had the opportunity to attend last Devoxx in Belgium. It was my first time attending a Devoxx conference and it was an awesome conference. During the event, I joined an Hackergarten organised by Arun Gupta and had the chance to contribute tests for a suit of Java EE 7 Samples in Github. Since I’m very interested in Batch processing, I started to write a few tests for the JSR-352 samples and very quickly we found a possible bug in the specification.
So, Arun Gupta told me how could I report the bug and check all the information related with the JSR-352 and told me about the JCP and the Adopt a JSR processes. The bug that we found was already reported and you can check it here.
I later met Heather VanCura that manages the JCP Program Office and she was very interested in the experience I just had at the Hackergarten. For that reason, I was interviewed to tell my own story and hopefully inspire other developers to contribute to the JCP or the Adopt a JSR processes. Here is the interview:
I continue to contribute to the Java EE 7 Samples project and you are also invited to do so if you wish. I’ve found more bugs and this is my first report and contribution to the Java ecosystem.
Today’s post will show you how to build a very simple application using Java EE 7 and Angular JS. Before going there let me tell you a brief story:
I have to confess that I was never a big fan of Javascript, but I still remember the first time I have used it. I don’t remember the year exactly, but probably around mid 90’s. I had a page with 3 frames (yes frames! remember those? very popular around that time) and I wanted to reload 2 frames when I clicked a link on the 3rd frame. At the time, Javascript was used to do some fancy stuff on webpages, not every browser have Javascript support and some even required you to turn it on. Fast forwarding to today the landscaped changed dramatically. Javascript is a full development stack now and you can develop entire applications written only in Javascript. Unfortunately for me, sometimes I still think I’m back in the 90’s and don’t give enough credit to Javascript, so this is my attempt to get to know Javascript better.
Why Java EE 7? Well, I like Java and the new Java EE version is pretty good. Less verbose and very fast using Wildfly or Glassfish. It provides you with a large set of specifications to suit your needs and it’s a standard in the Java world.
Why Angular JS?
I’m probably following the big hype around Angular here. Since I don’t have much experience with Javascript I don’t know the offers very well, so I’m just following advice of some friends and I have also noticed a big acceptance of Angular in the last Devoxx. Every room with an Angular talk was full, so I wanted to give it a try and found out for myself.
The Application
For the application, it’s a simple list with pagination and a REST service that feeds the list data. Every time I start a new enterprise project it’s usually the first thing we code: create a table, store some data and list some random data, so I think it’s appropriate.
Starting with the backend, let’s define a very simple Entity class (some code is omitted for simplicity):
Person.java
Java
1
2
3
4
5
6
7
8
9
10
@Entity
publicclassPerson{
@Id
privateLongid;
privateStringname;
privateStringdescription;
}
If you’re not familiar with Java EE JPA specification, this will allow to model an object class into a database table by using the annotation @Entity to connect to the database table with the same name and the annotation @Id to identify the table primary key.
Two of my favourite new features on Java EE 7: now you can run sql in a standard way by using the properties javax.persistence.schema-generation.* and it also binds you to a default datasource if you don’t provide one. So for this case, it’s going to use the internal Wildfly H2 database for our application.
Finally, to provide the list data we need to query the database and expose it as a REST service:
PersonResource.java
Java
1
2
3
4
5
6
7
8
9
10
11
12
13
14
15
16
17
18
19
20
21
22
23
24
25
26
27
28
29
30
31
32
33
34
35
36
37
38
39
40
41
42
43
44
45
46
47
48
49
@Stateless
@ApplicationPath("/resources")
@Path("persons")
publicclassPersonResourceextendsApplication{
@PersistenceContext
privateEntityManager entityManager;
privateIntegercountPersons(){
Query query=entityManager.createQuery("SELECT COUNT(p.id) FROM Person p");
The code is exactly as a normal Java POJO, but using the Java EE annotations to enhance the behaviour. @ApplicationPath("/resources") and @Path("persons") will expose the REST service at the url yourdomain/resources/persons, @GET marks the logic to be called by the http GET method and @Produces(MediaType.APPLICATION_JSON) formats the REST response as JSON format. Pretty cool with only a few annotations.
To make it a little easier to exchange the needed information for the paginated list, I have also created the following wrapper class:
PaginatedListWrapper.java
1
2
3
4
5
6
7
8
9
publicclassPaginatedListWrapper<T>{
privateIntegercurrentPage;
privateIntegerpageSize;
privateIntegertotalResults;
privateStringsortFields;
privateStringsortDirections;
privateList<T>list;
}
And we are done with the backend stuff.
UI – Angular JS
To display the data we are going to use Angular JS. Angular extends the traditional HTML with additional custom tag attributes to bind data represented in Javascript variables by following a MVC approach. So, lets look to our html page:
index.html
XHTML
1
2
3
4
5
6
7
8
9
10
11
12
13
14
15
16
17
18
19
20
21
22
23
24
25
26
27
28
29
30
31
32
33
34
35
36
37
<!DOCTYPE html>
<!-- Declares the root element that allows behaviour to be modified through Angular custom HTML tags. -->
Apart from the Javascript and CSS declarations there is very little code in there. Very impressive. Angular also have a wide range of ready to use components, so I’m using the ng-grid to display the data and UI Bootstrap that provides a pagination component. The ng-grid also have a pagination component, but I liked the UI Bootstrap pagination component more.
There is something still missing. The Javascript file where everything happens:
The Javascript code is very clean and organised. Notice how everything gets added to an app controller, allowing you to have multiple separation of concerns on your business logic. To implement the required behaviour we just need to add a few functions to refresh the list by calling our REST service and monitor the grid data to refresh the view. This is the end result:
Next Steps:
For the following posts related with these series, I’m planning to:
You can clone a full working copy from my github repository and deploy it to Wildfly. You can find instructions there to deploy it. Should also work on Glassfish.
Update In the meanwhile I have updated the original code with the post about Manage Javascript dependencies. Please, download the original source of this post from the release 1.0. You can also clone the repo, and checkout the tag from release 1.0 with the following command: git checkout 1.0.
I hope you enjoyed the post! Let me know if you have any comments about this.